Content Scheduling: Automating Future Content Publication
With Pack, you can schedule your content to go live at a specified time. This feature is particularly useful for coordinating new product launches, special promotions, or timed discounts.
By scheduling a page or storefront/shop settings for a specific date and time, Pack will automatically deploy and publish these changes at the designated time.
There are two ways to schedule content in Pack:
- Schedules publish the live edits you've made to individual pages or site settings at a set time. Use them for one-off updates to a page or settings area.
- Content Releases group related changes across pages, sections, templates, and settings. You can schedule a release so that everything in it publishes together at a set time. Use them for launches and campaigns that span several pieces of content.
Schedule a Content Release
If your changes are saved in a Content Release, schedule the release itself instead of adding its pages to a schedule. When the scheduled time arrives, Pack publishes every change in the release at once, just like clicking Publish.
Release schedules are managed from the release itself, not from Schedules in Pack's admin. The Schedule page option isn't available in the Customizer while a release is selected.
Using the Customizer
- Navigate to the Customizer.
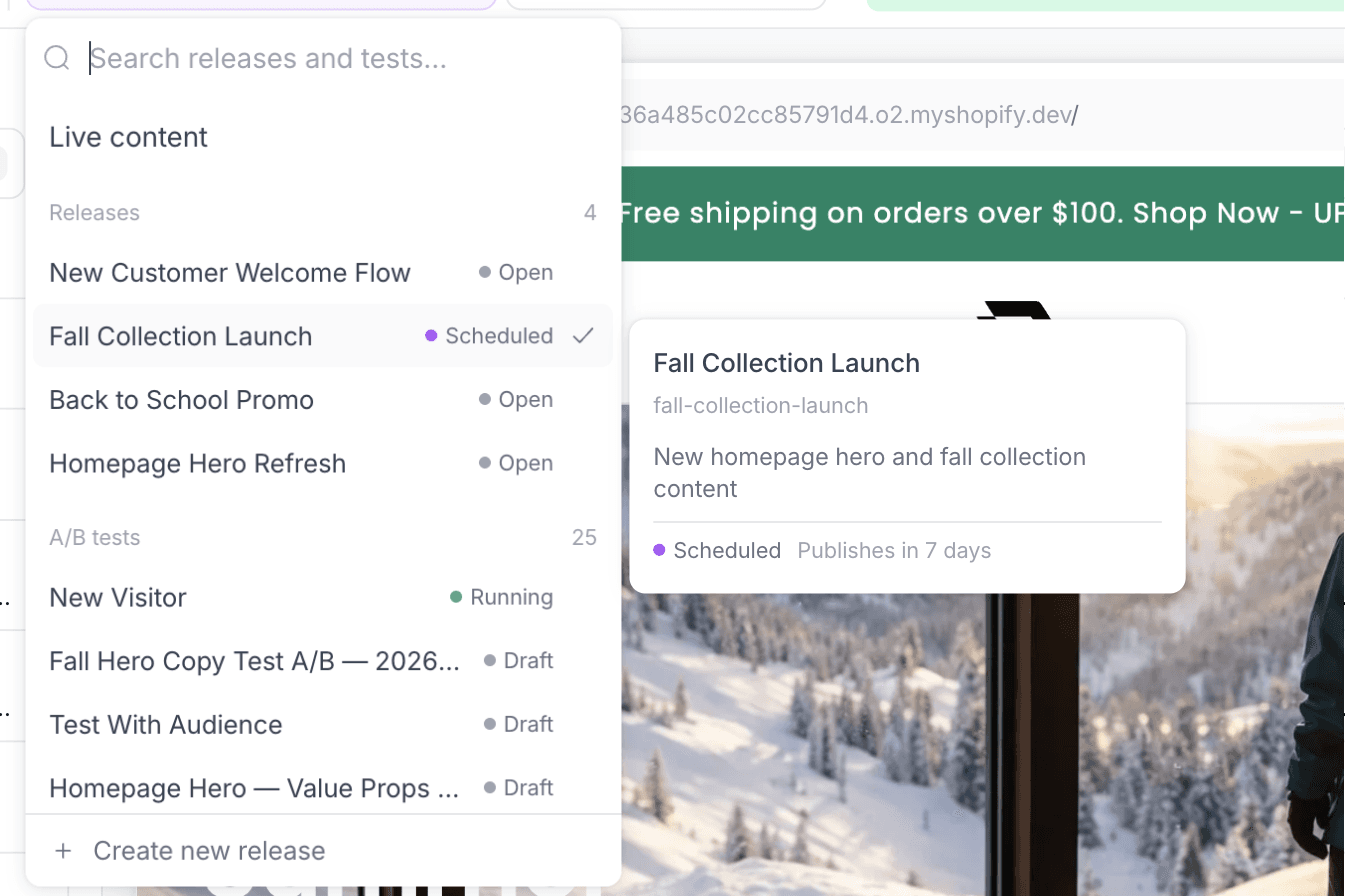
- Open the perspective picker in the toolbar and select your release.
- Click Review release. If you have unsaved edits, click Save to Release first.
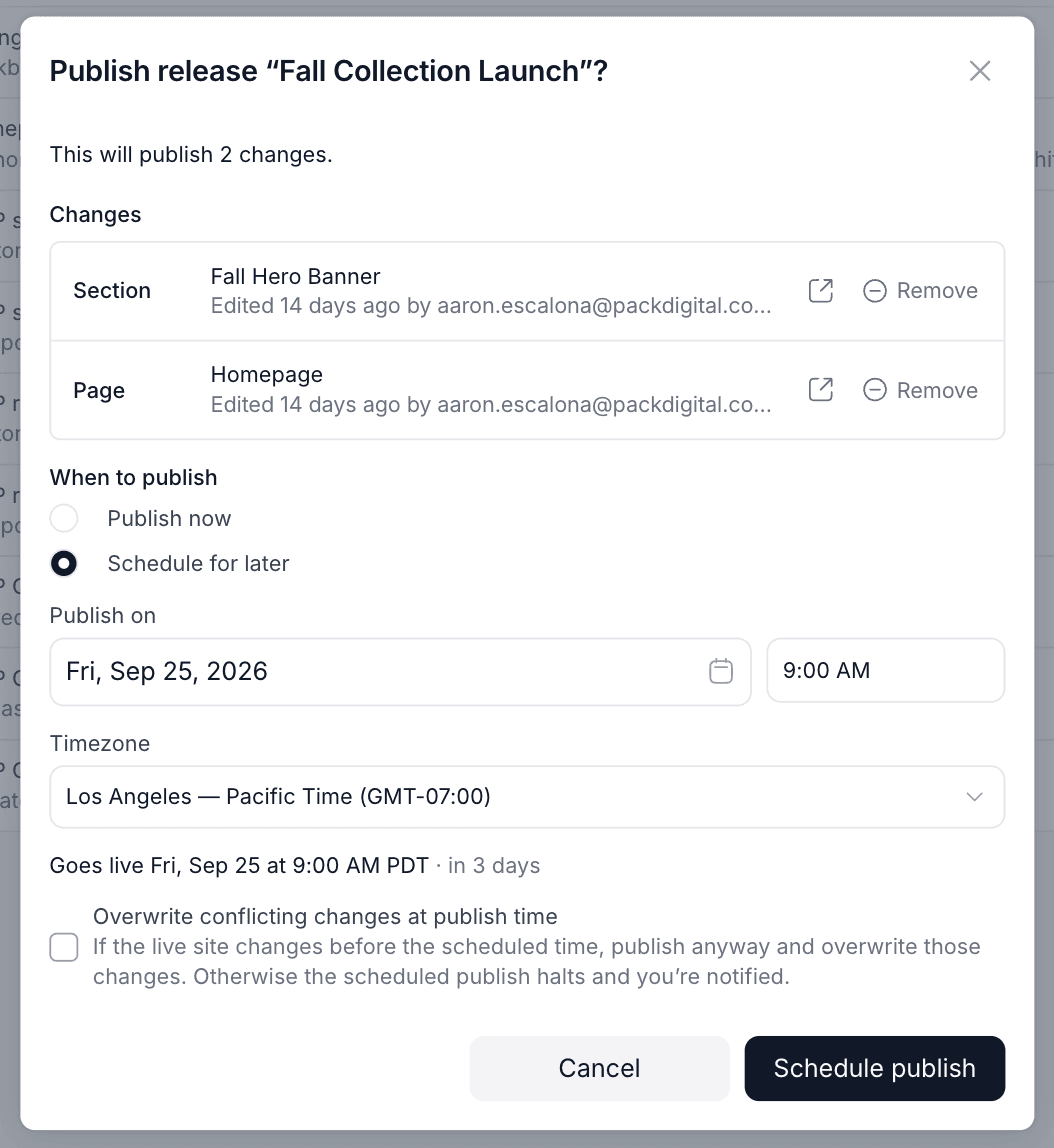
- Under When to publish, select Schedule for later.
- Under Publish on, pick a date and time, then confirm the Timezone. The timezone defaults to your browser's timezone. Pack shows a preview of when the release goes live, such as "Goes live Fri, Sep 25 at 9:00 AM PDT · in 3 days."
- Decide whether to overwrite conflicting changes at publish time (see Conflicts and scheduled releases below).
- Click Schedule publish.
Once the release is scheduled, it shows a Scheduled status in the perspective picker. Hover over the release to see when it publishes.
Using Pack's Admin
- In Pack's admin, go to Releases.
- Open the actions menu (⋮) for the release and select Schedule publish… to open the publish dialog with Schedule for later already selected.
- Review the changes included in the release.
- Choose the publish date, time, and timezone.
- Click Schedule publish.
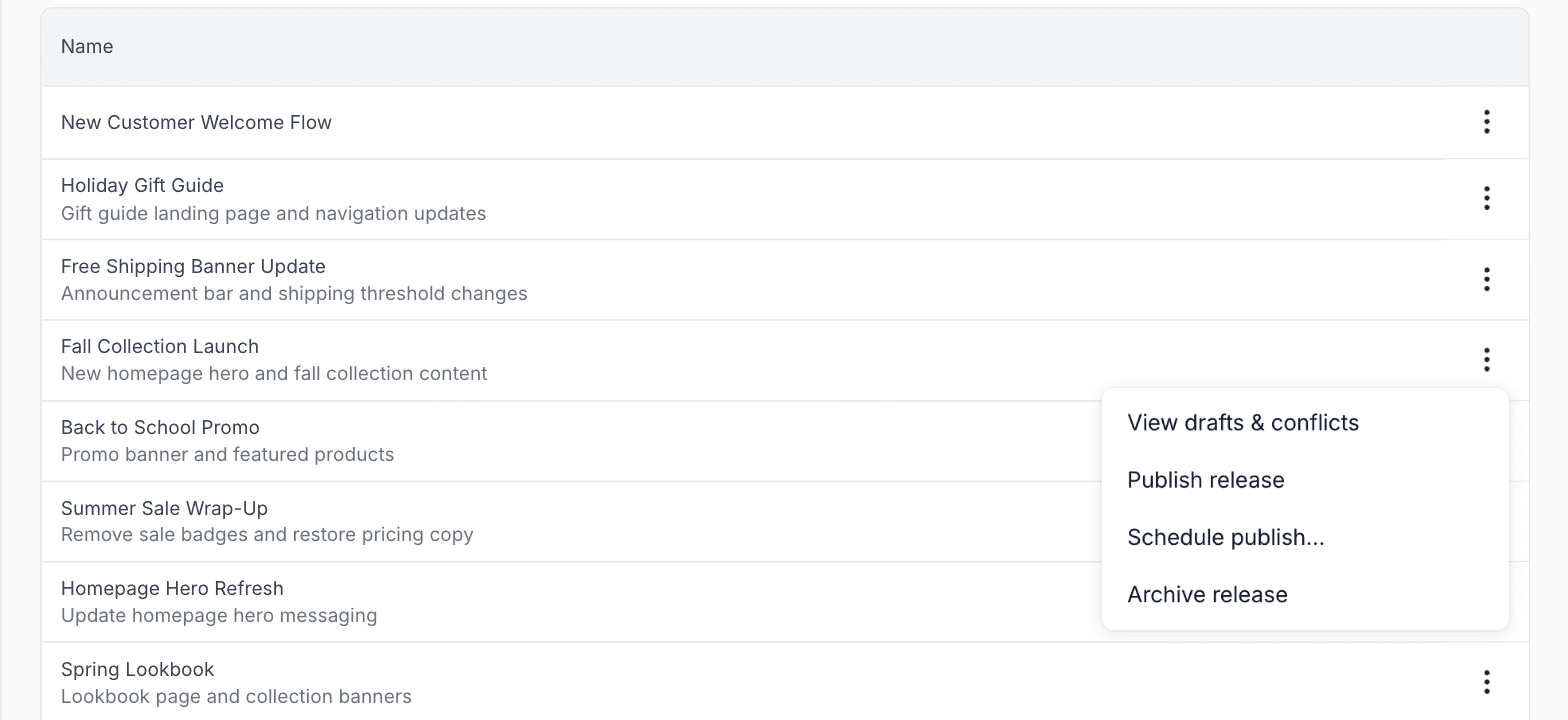
In the Releases list, the release shows a Scheduled status and its publish time, such as "Publishes Sep 29, 9:00 AM PDT."
Keep editing a scheduled release
A scheduled release stays open for editing. Changes you save to the release before the scheduled time are included when it publishes. There's no need to reschedule after each edit.
If you remove every change from a scheduled release, Pack also removes its schedule, since there's nothing left to publish.
Edit or remove a release schedule
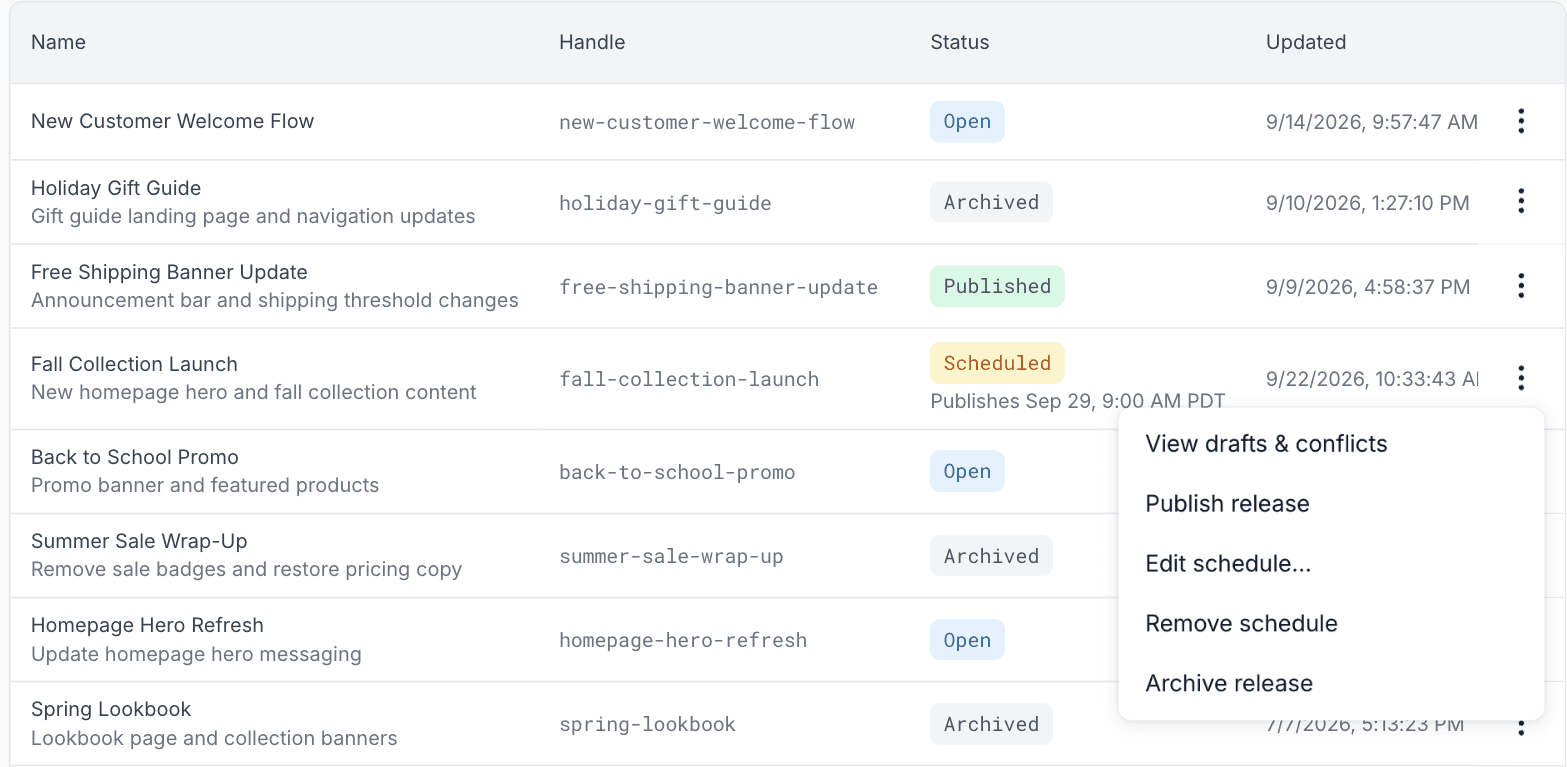
Once a release is scheduled, its actions menu in Releases replaces Schedule publish… with Edit schedule… and Remove schedule.
To change the publish time:
- In the Customizer, select the release and click Review release. The dialog opens with Schedule for later selected and the current publish time filled in. Choose a new date or time and click Schedule publish.
- In Pack's admin, go to Releases, open the release's actions menu, and select Edit schedule…
To cancel the scheduled publish without deleting the release, go to Releases in Pack's admin, open the release's actions menu, and select Remove schedule. The schedule is removed right away, and the release goes back to Open so you can keep editing, publish it, or schedule it again later.
A few other actions also affect a release's schedule:
- Publishing the release manually before its scheduled time publishes it right away and removes the schedule.
- Archiving the release cancels its scheduled publish.
Conflicts and scheduled releases
A conflict means the live version of content in the release has changed since the release was created. Pack checks for conflicts both when you schedule the release and again when the scheduled publish runs.
- If the release already has conflicts when you schedule it, the dialog title changes to Review live changes before publishing and lists the conflicting content under Needs review. The overwrite option is checked and locked, and the confirm button reads Schedule anyway. Scheduling it means the release will overwrite those live changes when it publishes.
- If new conflicts appear before the scheduled time, what happens depends on the Overwrite conflicting changes at publish time option:
- Checked: The release publishes on schedule and replaces the newer live changes with the release's version.
- Unchecked (default): Pack doesn't publish the release. It removes the schedule and emails the person who scheduled it to say why. Review the conflicts, then publish or reschedule the release.
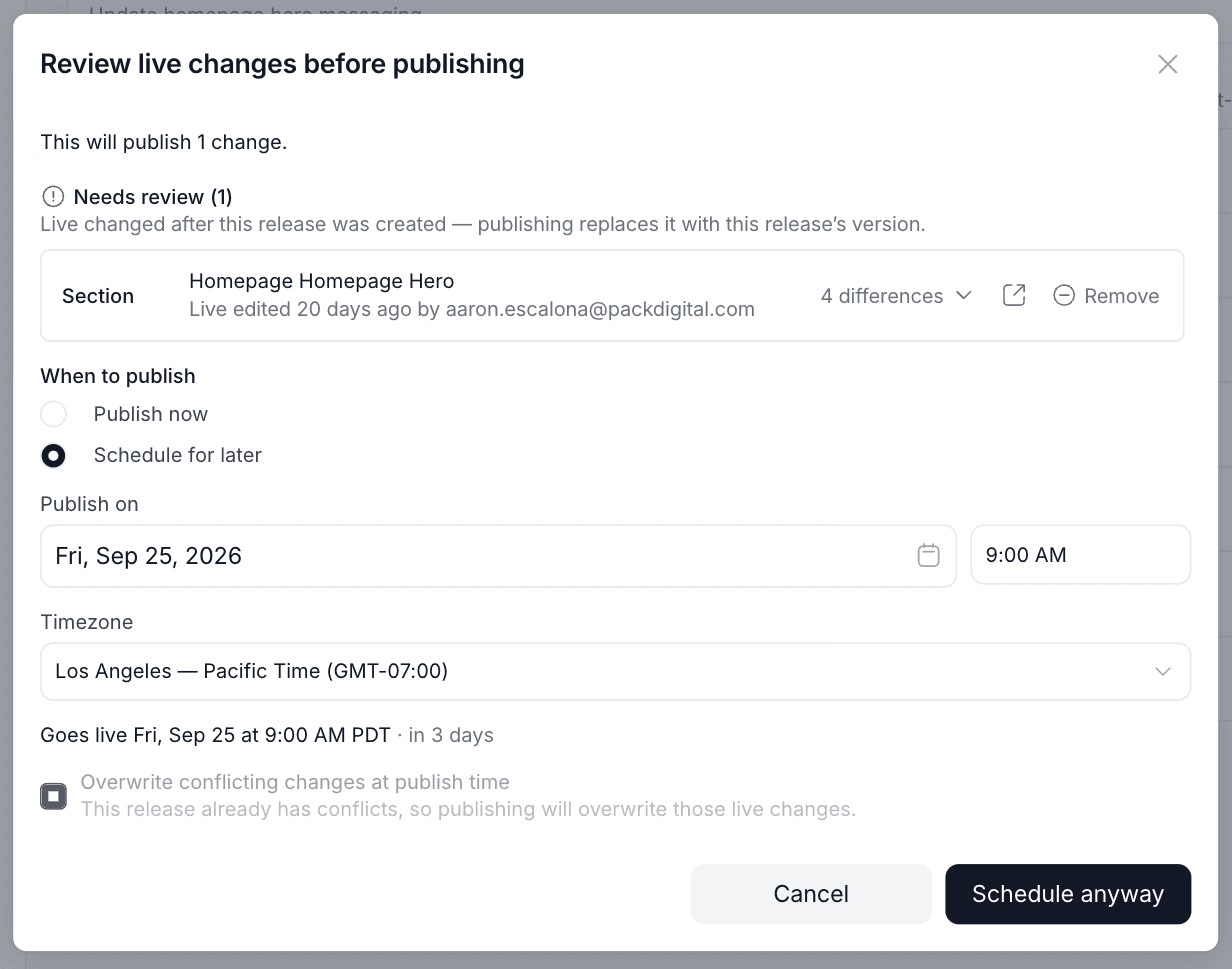
Only check Overwrite conflicting changes at publish time if the release should always win over live edits made before launch. Otherwise, newer live changes can be silently replaced when the release goes live.
If a scheduled publish fails for any other reason, Pack retries it. If it still can't publish, Pack removes the schedule and emails the person who scheduled it.
As with other schedules, your storefront or shop's caching policy may delay when visitors see the published changes.
Schedule a Page
You can add a page to a schedule via the Customizer or Pack’s admin. Please allow up to 15 minutes for the scheduled changes to go live. Wait times will be impacted by your Hydrogen caching policy.
Using the Customizer
- Navigate to the Customizer.
- Make changes to your page.
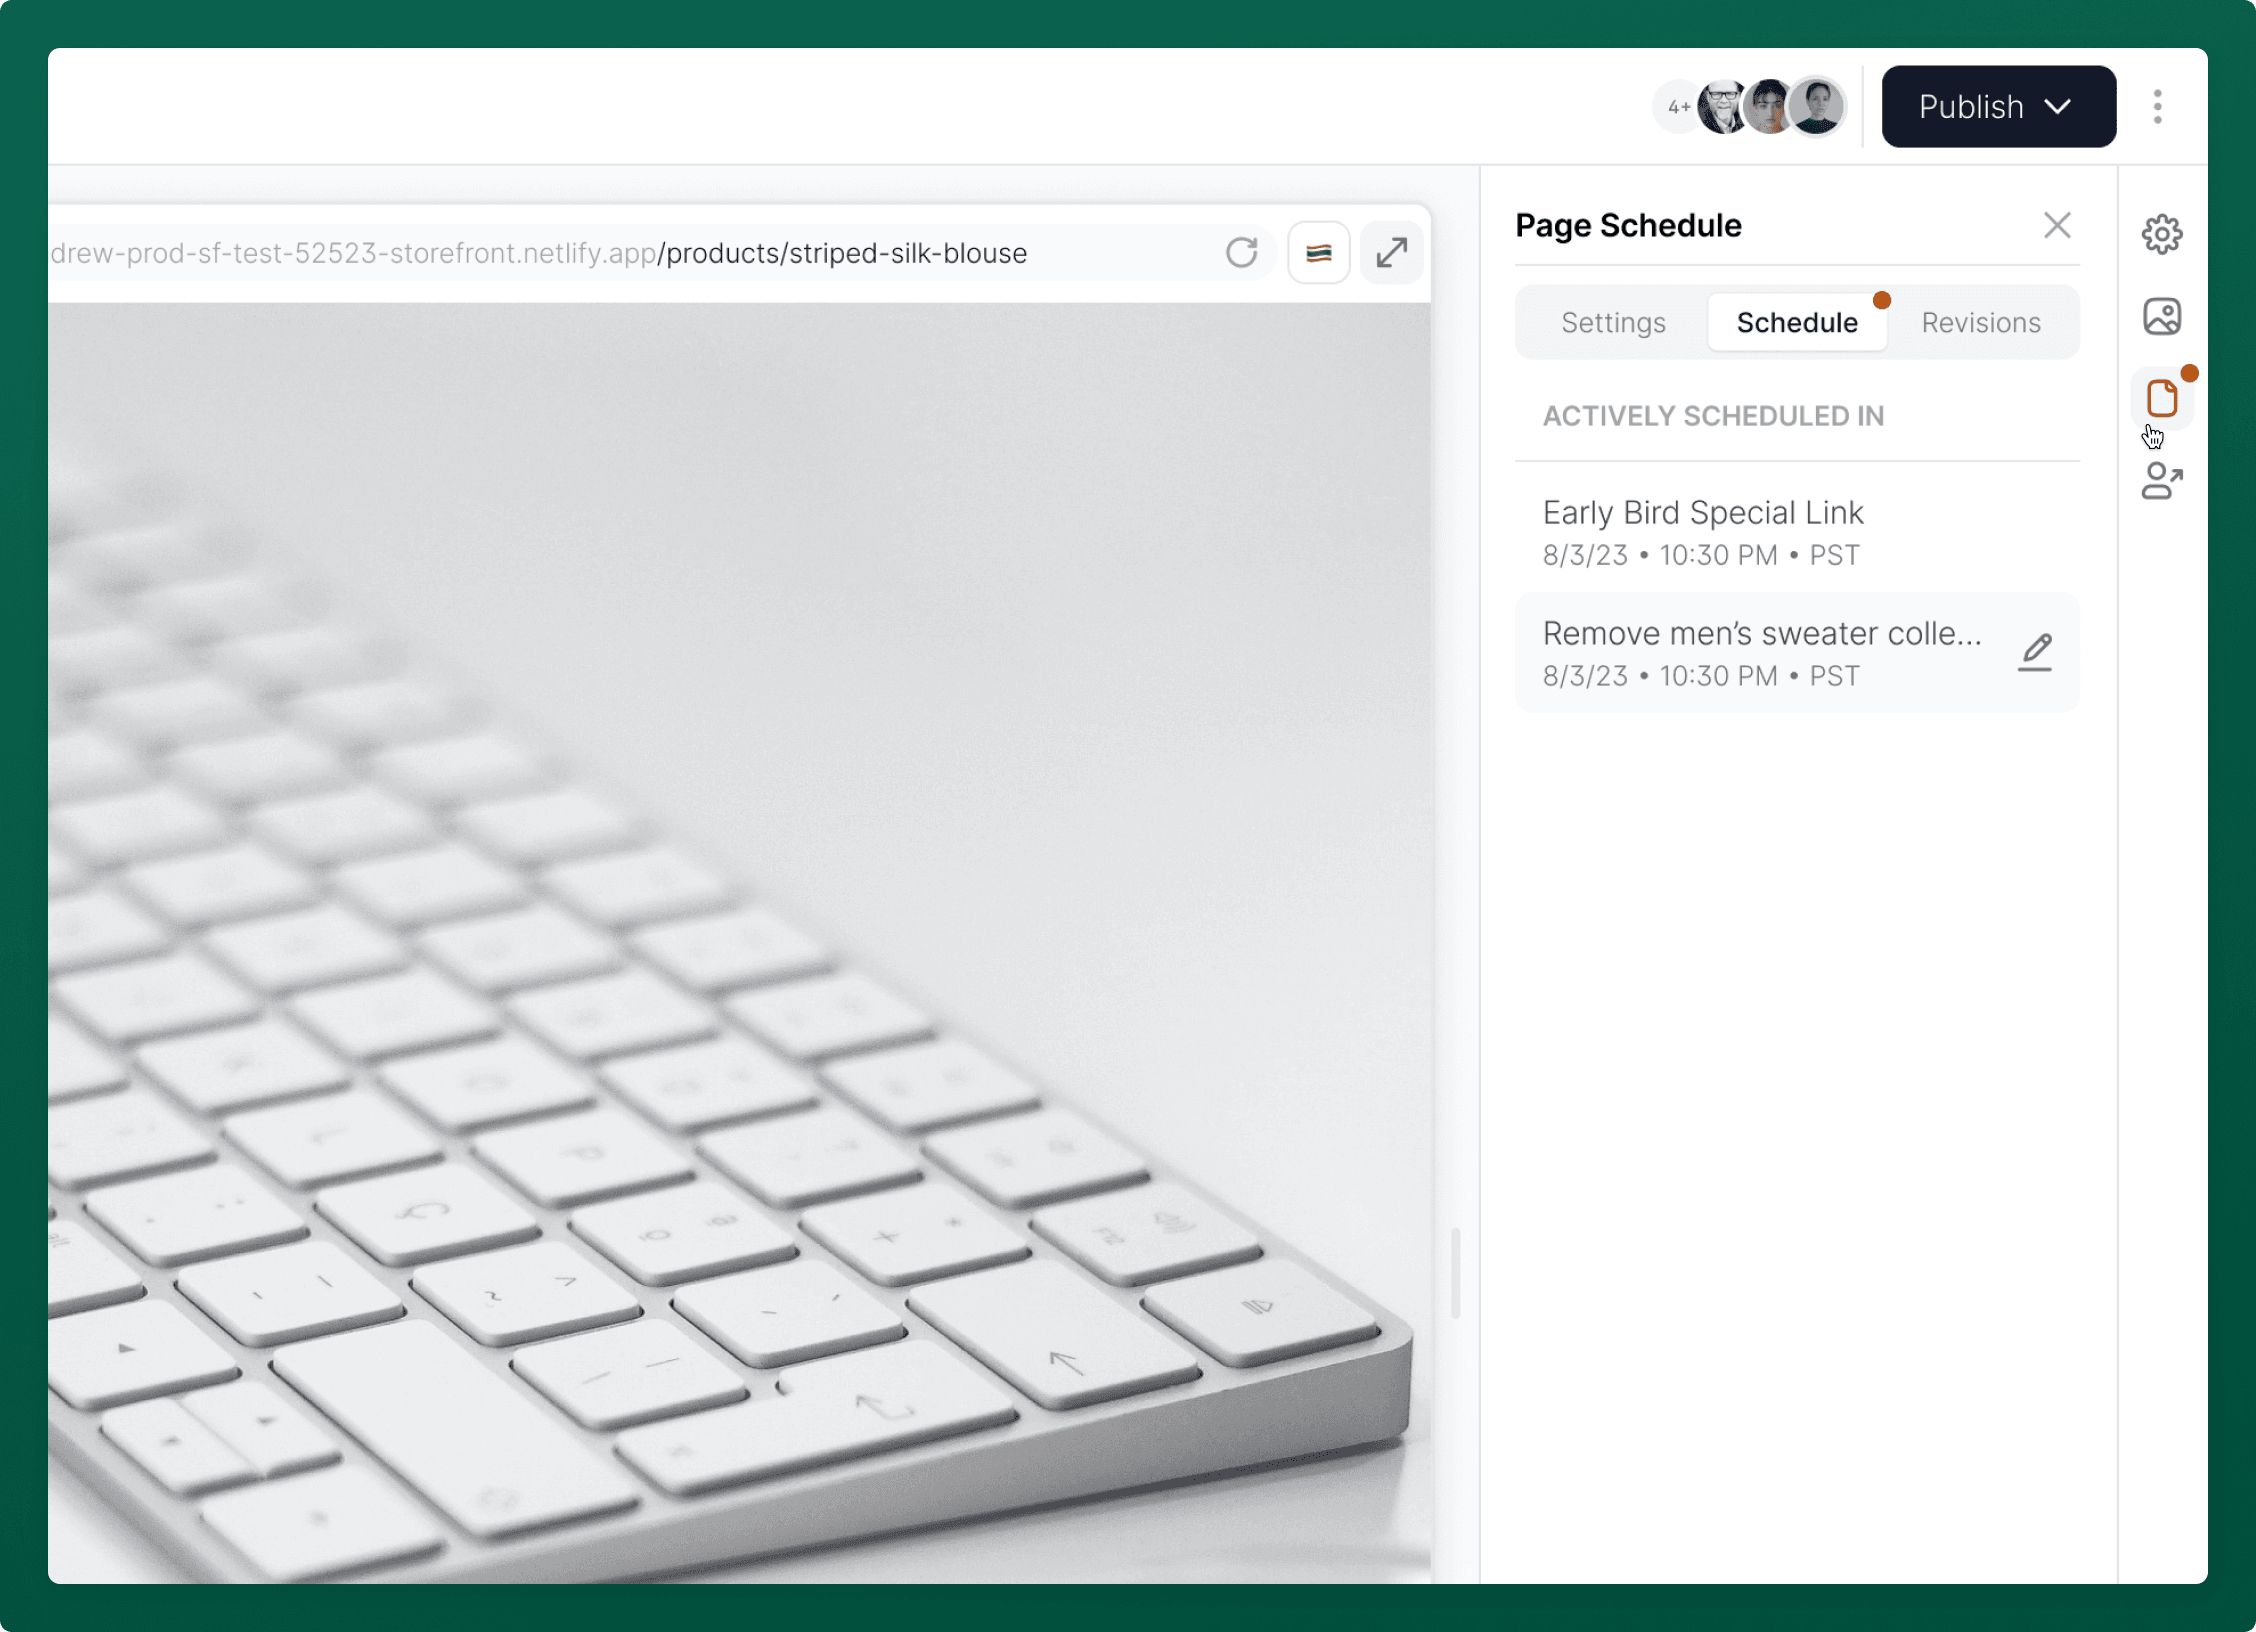
- Select "Schedule Page" in the top left corner.
- Choose to create a new schedule or add to an existing one.
- Confirm your schedule by checking that your page indicates a 'Scheduled' page status.
Using Pack's Admin
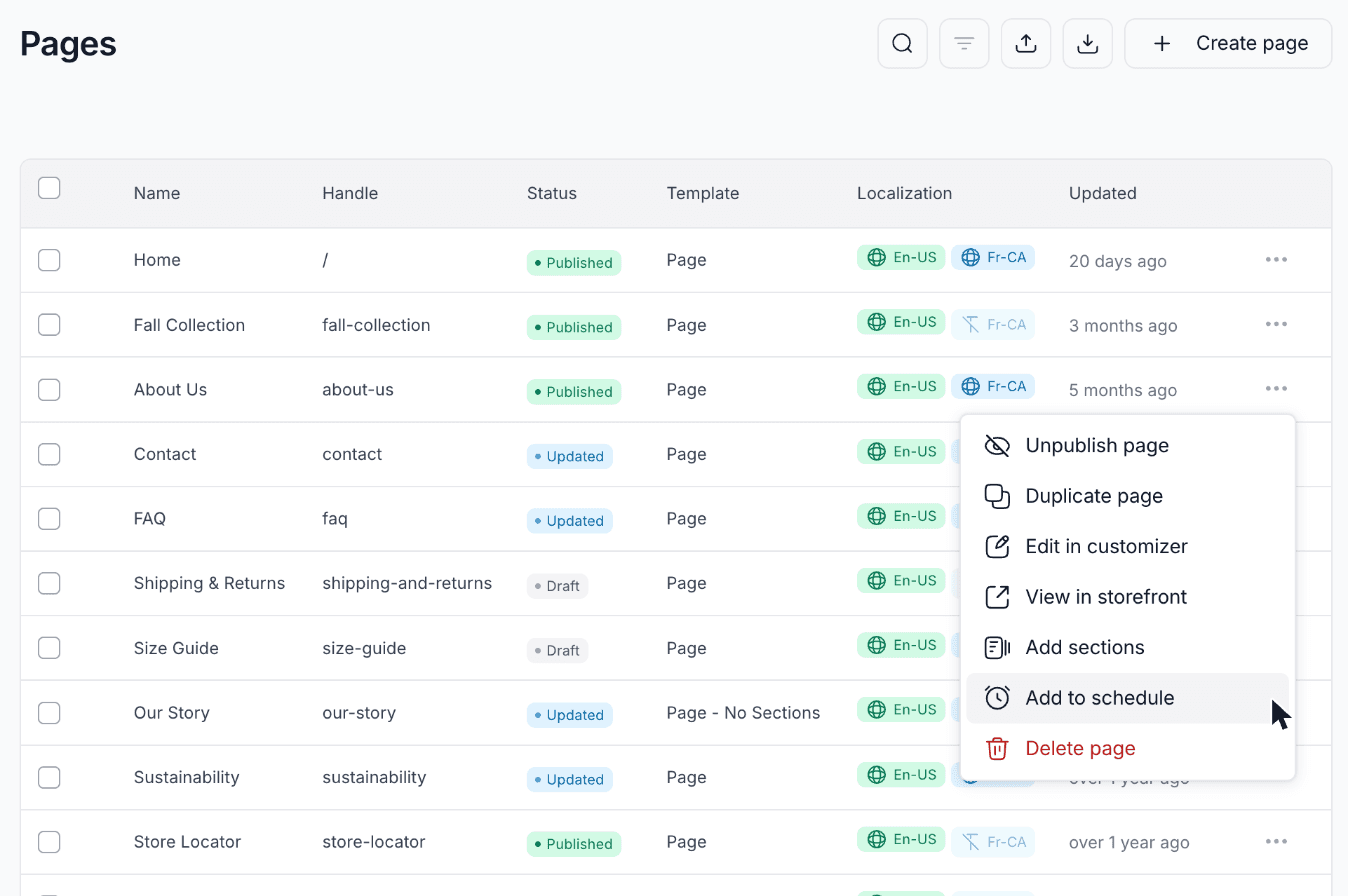
- In Pack’s admin, go to Pages.
- Click the three dots next to a page and select Add to schedule.
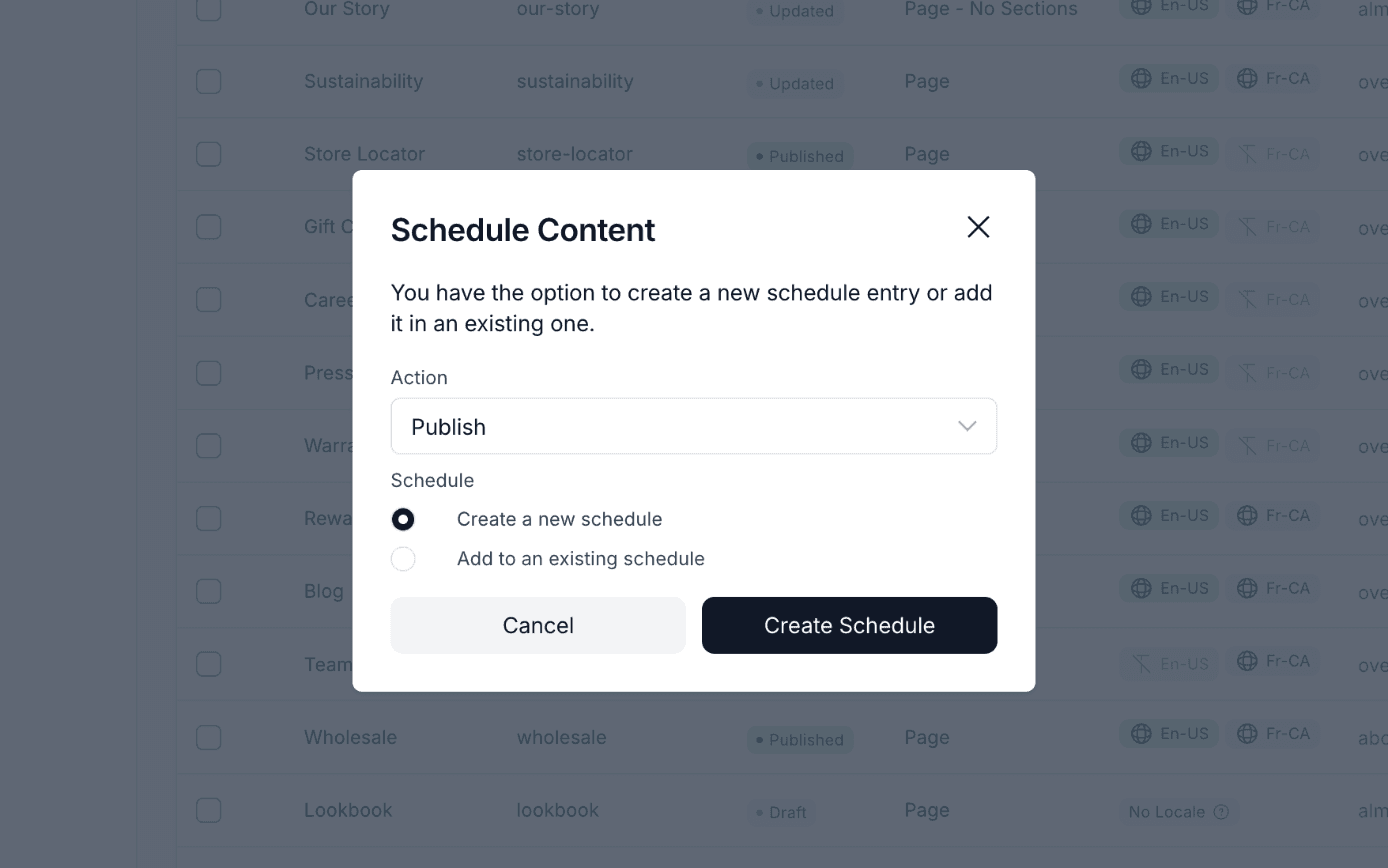
- Choose the Action to take at the scheduled time, such as Publish.
- Choose Create a new schedule or Add to an existing schedule, then click Create Schedule.
- If you're creating a new schedule, enter a Title, Date, Time, and Timezone, then click Create Schedule.
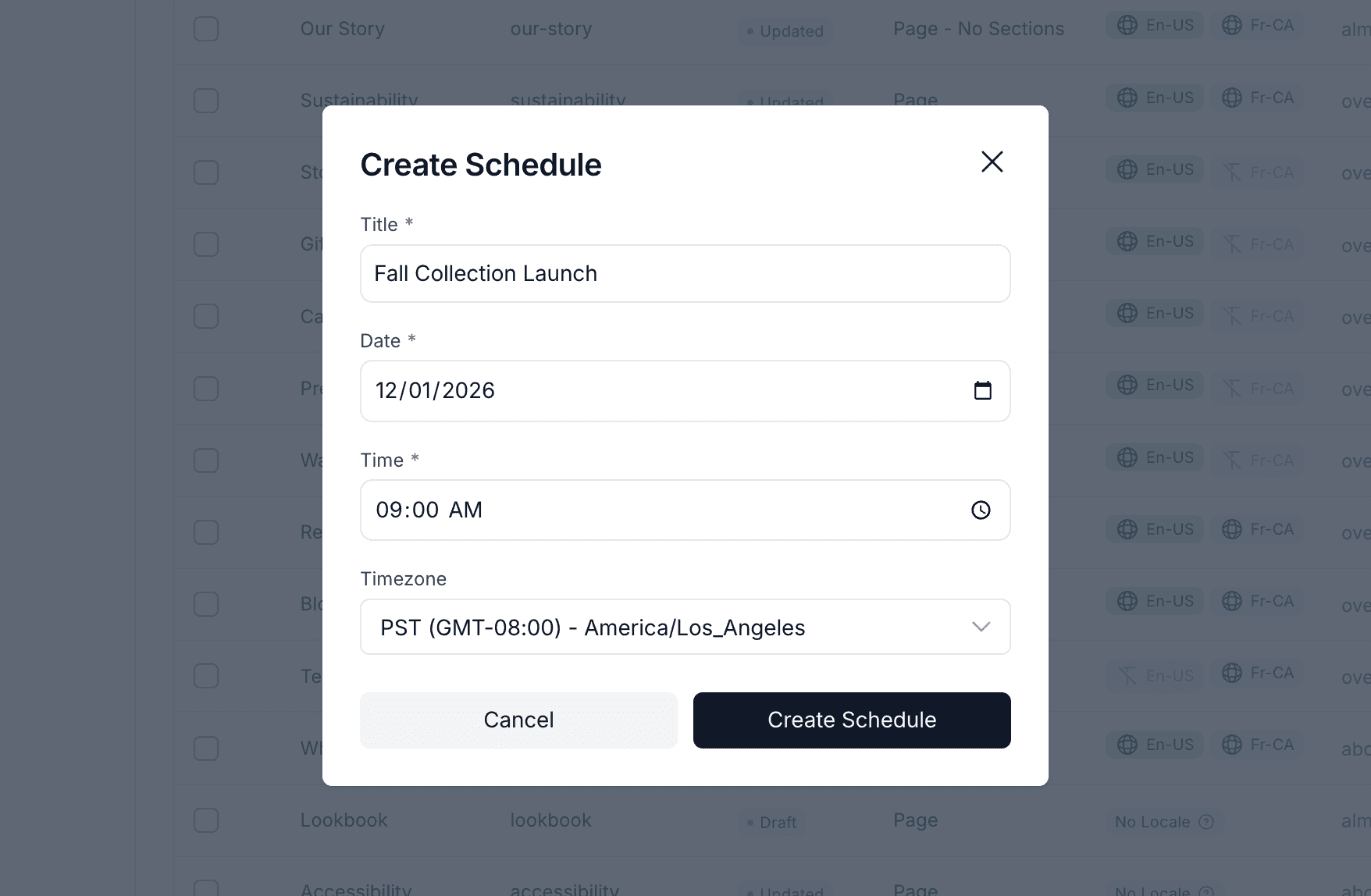
All pages under a schedule will be deployed and published at the set time.
Schedule Site Settings
Storefront or shop settings can be scheduled the same way as pages, and can share the same schedule.
- In Pack’s admin, navigate to Customizer and open Storefront Settings from the settings (gear) icon in the right toolbar.
- Make your changes, then open the Schedules tab.
- Click Schedule settings.
- Choose the Action, then choose Create new schedule or Add to existing schedule.
- Fill out the schedule details or pick an existing schedule, then click Create Schedule or Add to Schedule.
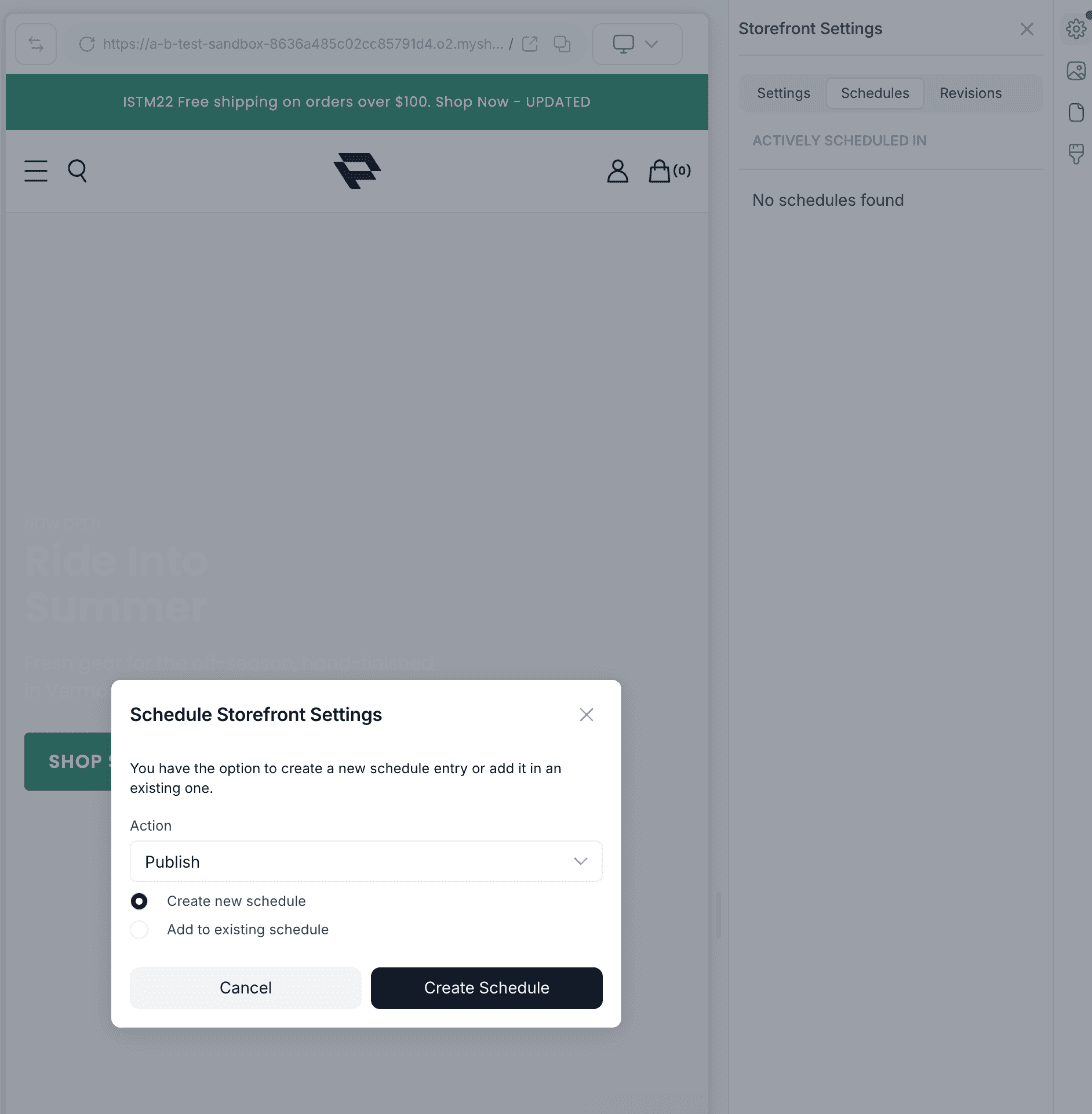
The Schedules tab lists every schedule the settings are part of under Actively scheduled in.
Remove Page from a Schedule
Using the Customizer
- Navigate to the Customizer and select the Scheduled button for the page.
- Choose the schedule to remove the page from and click the pencil icon.
- Remove the page from the schedule.
Using Pack Admin
- Go to Pack’s admin, then click Schedules.
- Click the schedule to open it.
- Under Scheduled content, click the three dots next to the page and select Remove from schedule.
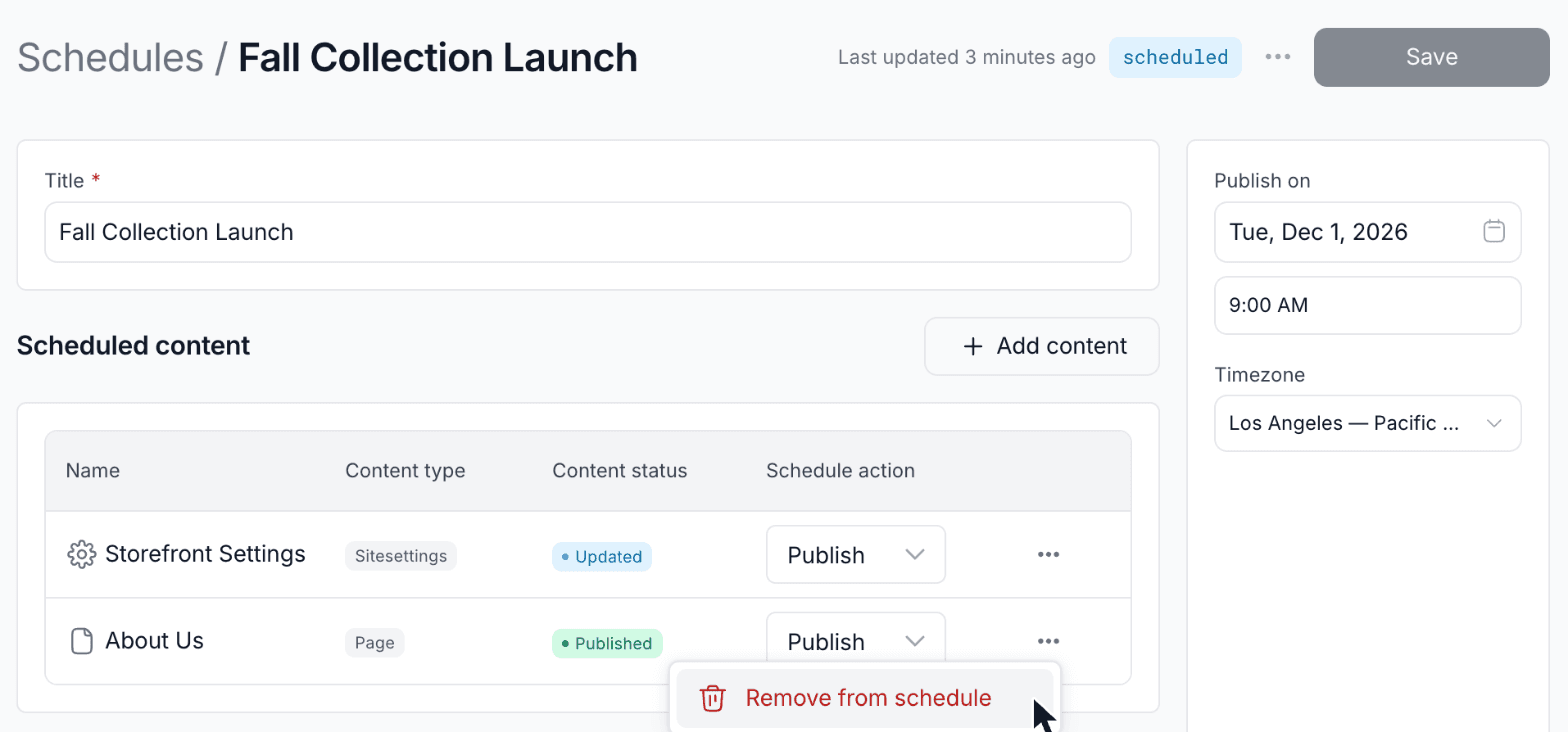
Edit an Existing Schedule
Using the Customizer
- Navigate to the Customizer and select Scheduled.
- Edit the schedule details.
Using Pack Admin
- Go to Pack’s admin, then click Schedules.
- Click on the schedule to edit and save changes.
Run a Schedule Manually
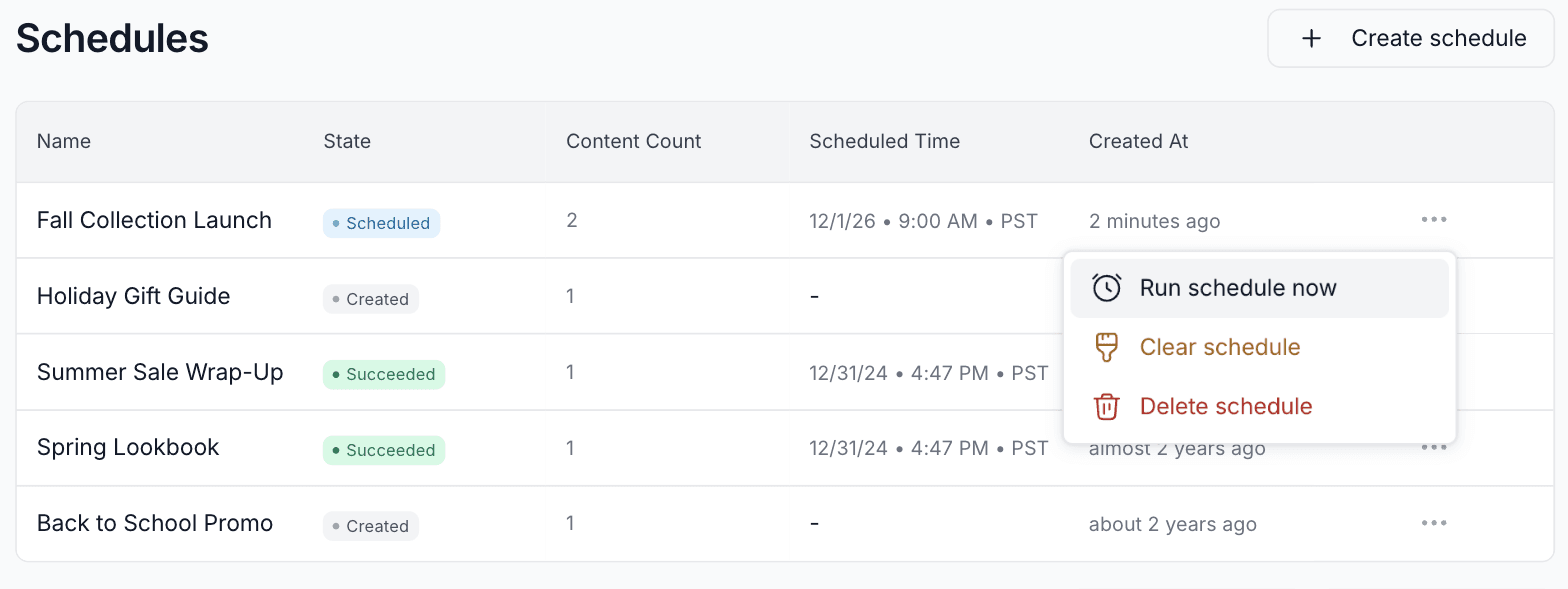
- Go to Pack’s admin > Schedules.
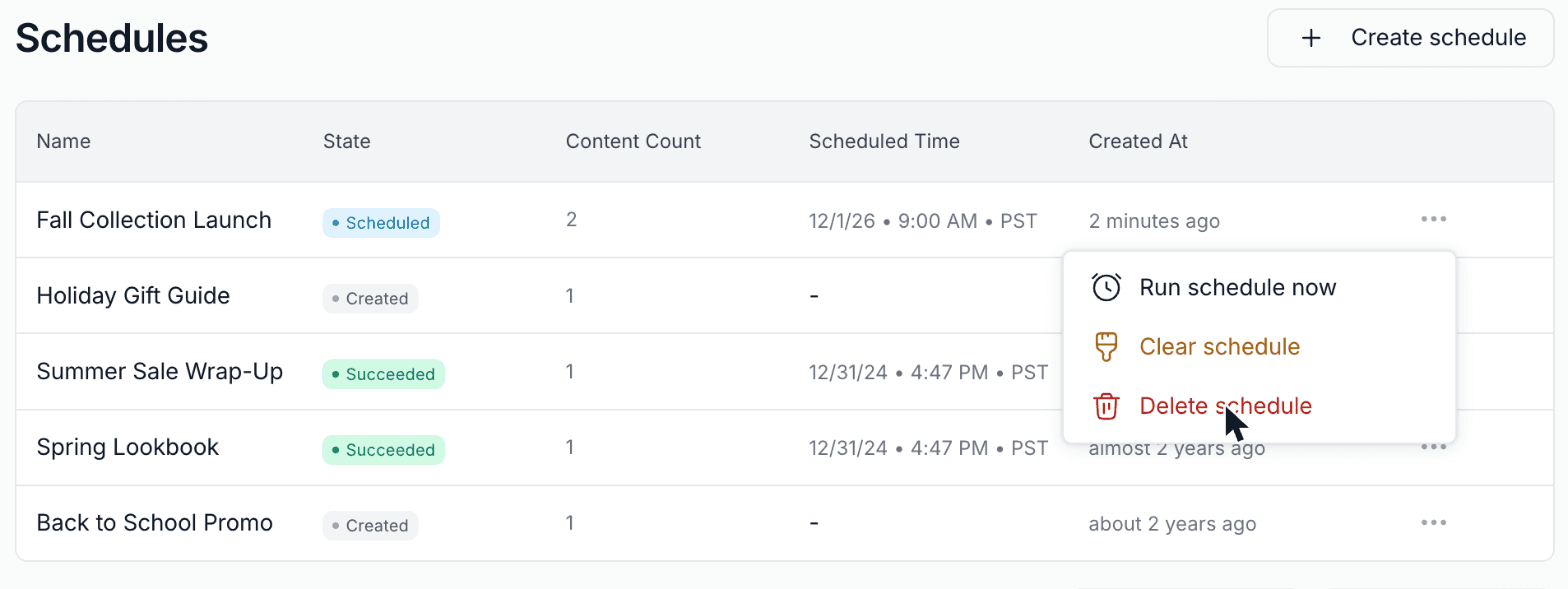
- Click the three dots next to the schedule and select Run schedule now for immediate deployment. The same option is in the three-dot menu at the top of a schedule's page.
- Depending on your storefront's or shop's caching policy, your content may take time to appear even after content has been published.
Delete a Schedule
A schedule that hasn’t run yet will not be executed if it's deleted. Old schedules that have already run can be deleted without any issues.
Using the Customizer
- Navigate to the Customizer and select Scheduled.
- Choose the schedule and delete it.
Using Pack’s Admin
- Go to Pack’s admin and click Schedules.
- Click the three dots next to the schedule and select Delete schedule. You can also open the schedule and use the three-dot menu at the top of the page.
- Type the schedule's name to confirm, then click Delete.
Clear a Schedule
You can clear an existing schedule to clear the time and date without deleting the schedule itself.
Using Pack’s Admin
- Go to Pack’s admin, click Schedules, click the three dots next to the schedule, and select Clear schedule.