Metaobjects: Implementing custom data models with Pack and Hydrogen
Metaobjects in Shopify empower merchants to define and manage custom data models on their storefronts.
Metaobjects facilitate the addition and storage of structured data within the storefront. These custom data models are vital for dynamically integrating content like product specifications, artist bios, and more across various site pages, ensuring consistency and streamlined management.
Use Cases
Metaobjects are ideal for content that demands uniformity and minimal updates.
Common use cases for metaobjects include:
- Artist/designer profiles
- Size charts
- Product specifications
- Ingredient lists
- Manufacturing information
- Content blocks for landing pages
These applications demonstrate the utility of metaobjects in maintaining content consistency.
Implementation Process
Implementing metaobjects in a Pack-powered Hydrogen storefront involves these key steps:
- Create the metaobject definition in Shopify
- Create metaobject entries in Shopify admin
- Create a section schema in your Pack project
- Render the section in your routes with
<RenderSections> - Implement the component to render metaobject content
Create Metaobject Definition in Shopify
First, create your metaobject definition in Shopify:
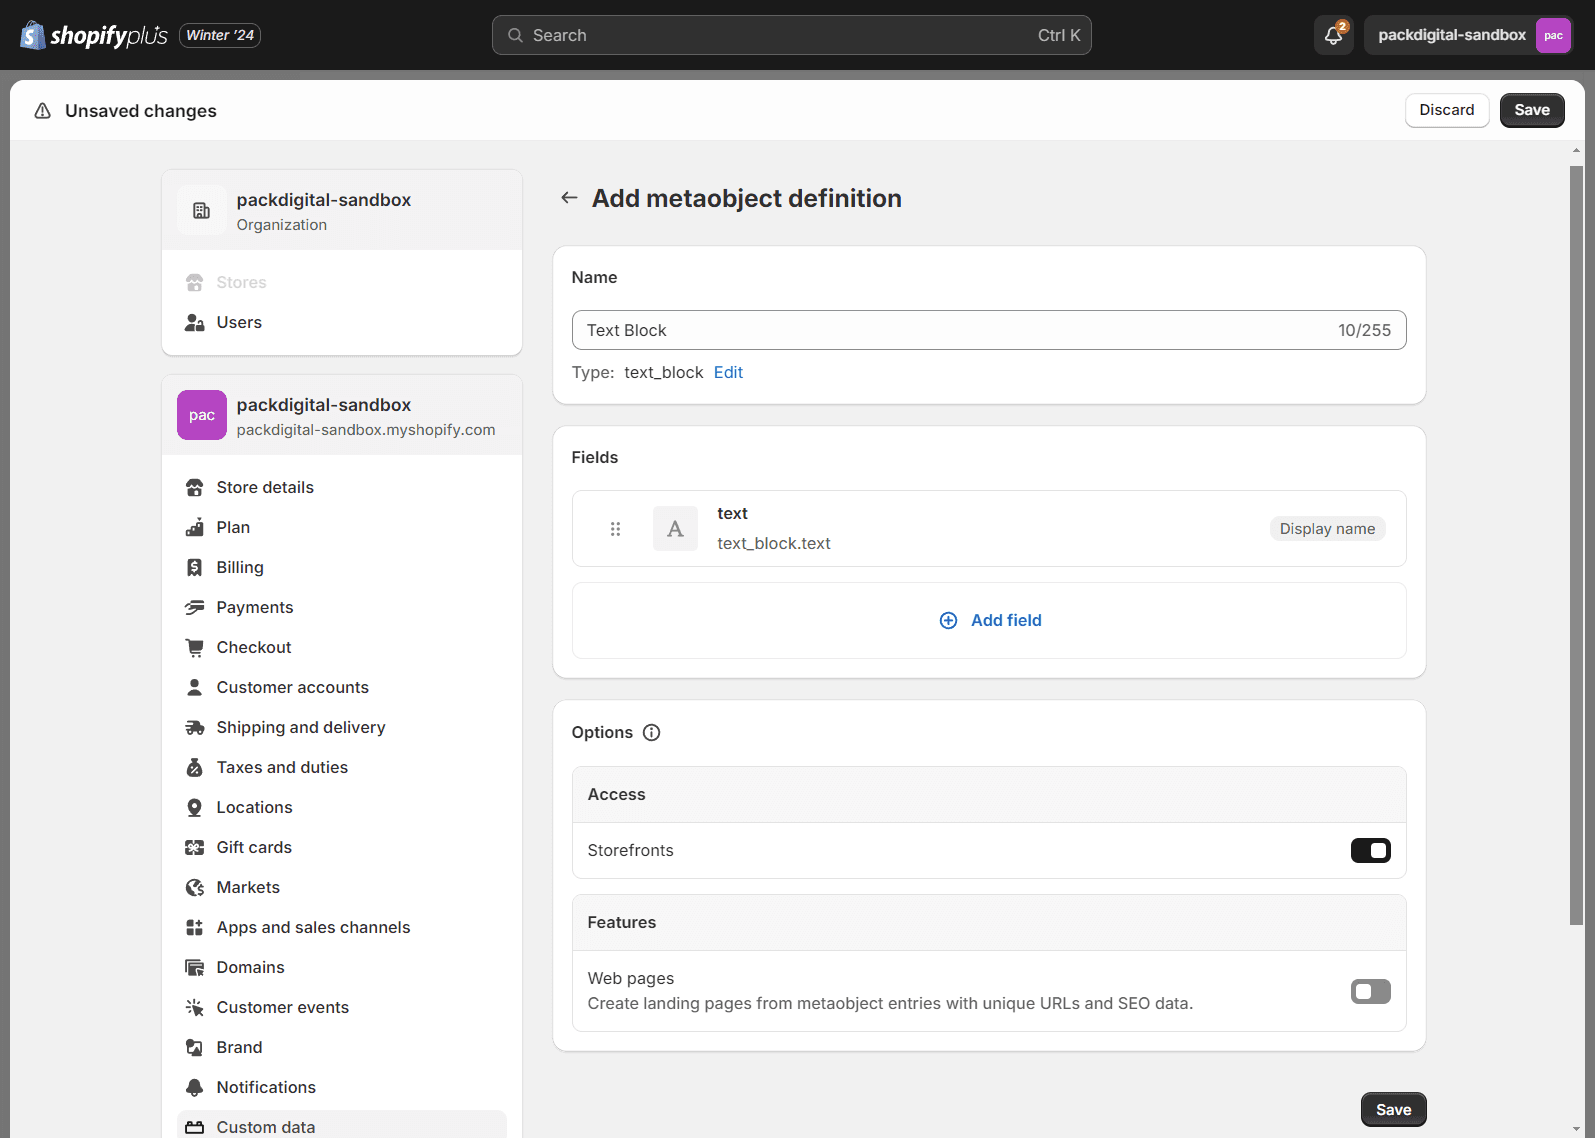
- In Shopify admin, go to Settings > Custom data (or alternatively, Content > Metaobjects)
- Click Add definition
- Fill in the fields to define your metaobject:
- Name - The name of your metaobject definition
- Fields - Add fields to define your object's structure (text, rich text, image, etc.)
- Access Options - Make sure to check "Storefronts" to make it available
- Save the definition
For more detailed instructions on creating metaobject definitions, refer to Shopify's guide on building a metaobject.
Create Metaobject Entries
You can also create entries from Pack's Customizer. See Use metaobject sections in Pack's Customizer.
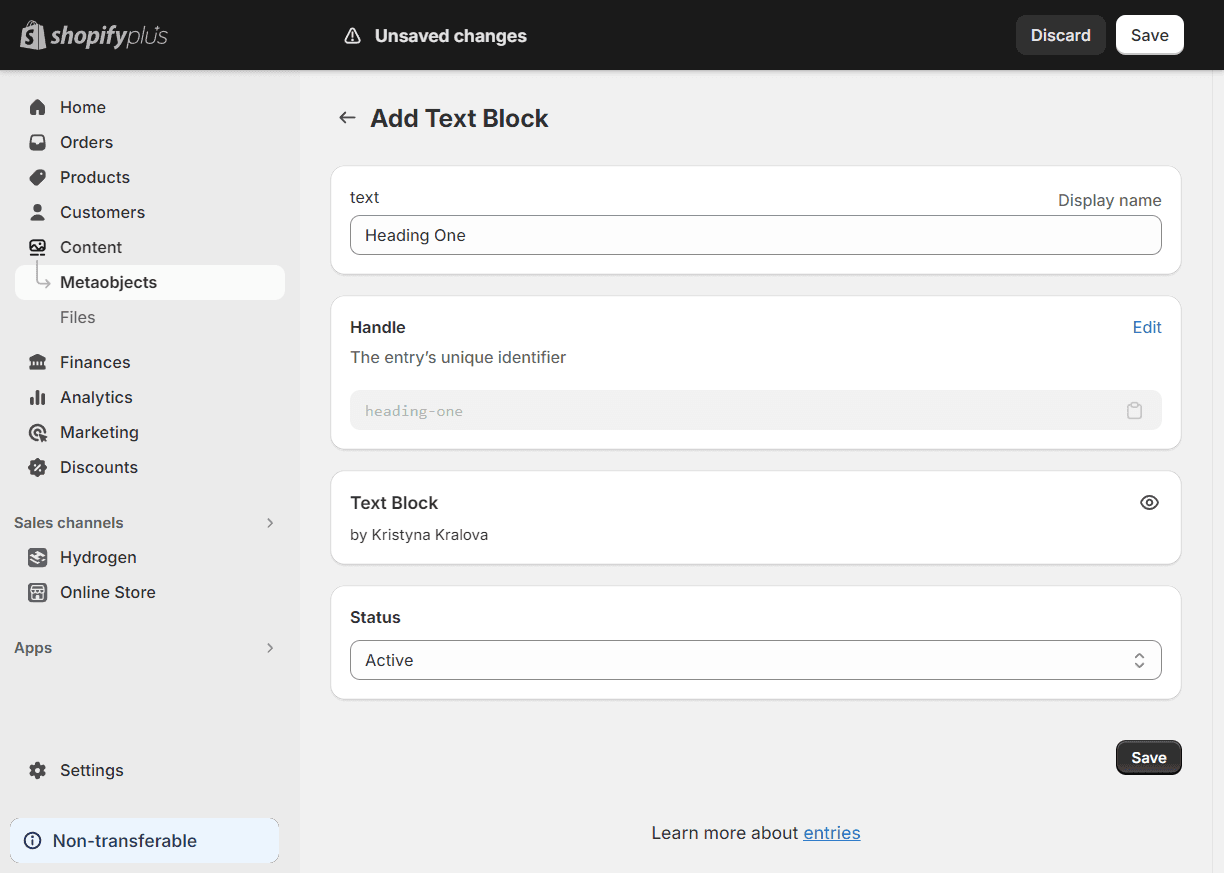
Next, create entries for your metaobject definition:
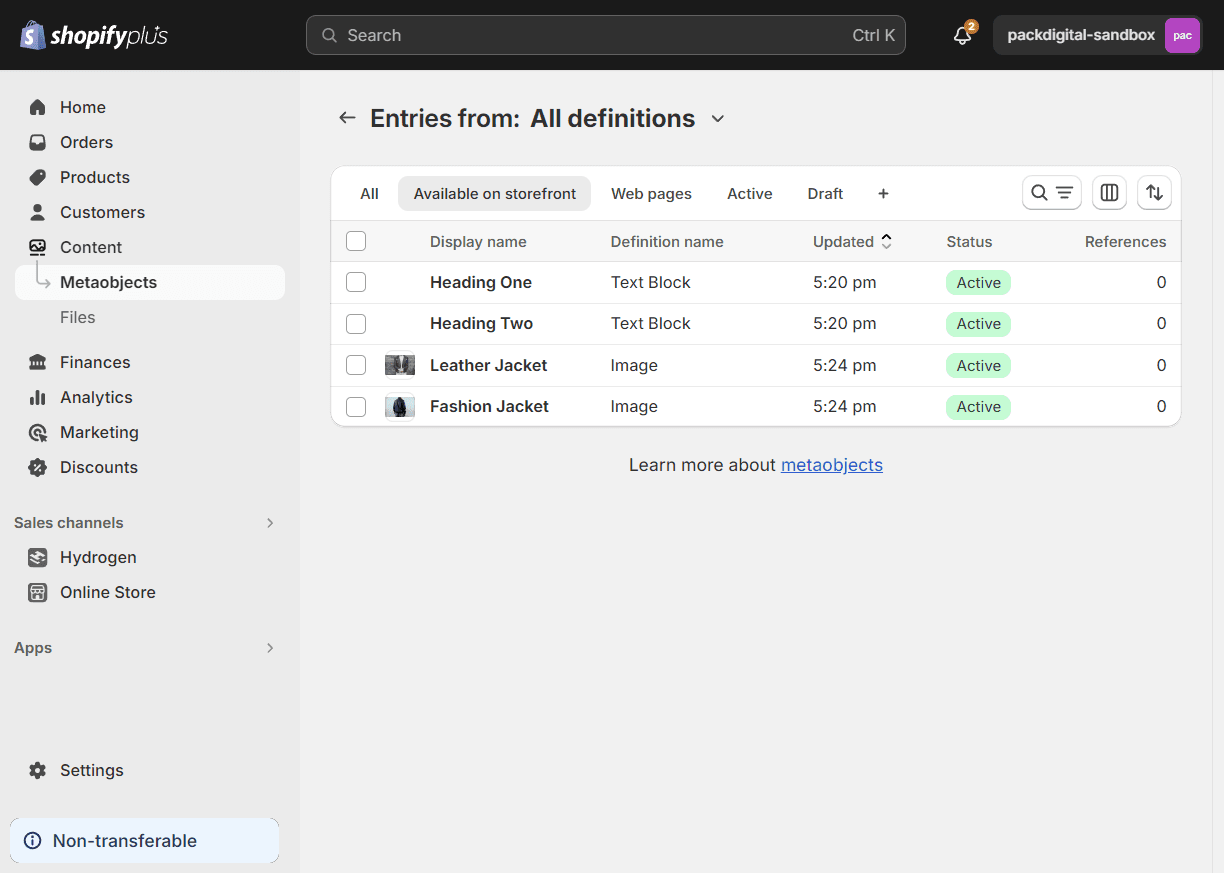
- In Shopify admin, go to Content > Metaobjects
- Click on the metaobject definition you created
- Click Add entry
- Fill in the field values for your entry
- Save the entry
- Repeat for any additional entries you need
Create a Pack Section Schema
In your Pack project, create a section that will display your metaobject content. This involves creating a schema file that defines how Pack should interact with the metaobject data. For more details on creating schemas, refer to the Section Schema API.
- Create a new section folder in app/sections with the following structure:
-
MetaobjectTextBlock.schema.tscontaining your component's schema. UsedataSourceto pull in the metaobject data from Shopify.export function Schema() { return { category: 'Text', label: 'Text Block', key: 'metaobject-text-block', previewSrc: 'https://cdn.shopify.com/s/files/1/0671/5074/1778/files/text-block-preview.jpg?v=1675730349', dataSource: { source: 'shopify', // where the data is coming from, in this case Shopify type: 'metaobject', // what type of data it is, in this case a metaobject reference: { type: 'text_block', // what the definition is called in Shopify }, }, fields: [], } } -
MetaobjectTextBlock.tsxcontaining your component's code. You can reference thecmsprop to get the fields needed based off of what you defined in Shopify for the metaobject.import { Schema } from './MetaobjectTextBlock.schema' export function MetaobjectTextBlock({ cms }: { cms: Record<string, any> }) { const { button_link, button_link_text, heading, subtext } = cms return ( <div className="your-container-styles"> {heading && <h1>{heading}</h1>} {subtext && <div>{subtext}</div>} {button_link && <a href={button_link}>{button_link_text}</a>} </div> ) } MetaobjectTextBlock.Schema = SchemaAttach the schema as
MetaobjectTextBlock.Schema.registerSection()reads it there. If it's missing, registration throws an error when the storefront starts, and no page loads. -
index.tsexporting your new section component.export { MetaobjectTextBlock } from './MetaobjectTextBlock'
-
Register the new section in
app/sections/index.tsx:import { registerSection } from '@pack/react' import type { Section } from '@pack/types' import { MetaobjectTextBlock } from './MetaobjectTextBlock' export function registerSections() { registerSection(MetaobjectTextBlock as Section, { name: 'metaobject-text-block' }) }Register the section under the same
nameas its schema'skey(metaobject-text-block). Pack finds each section's component by that key, so a section registered under a different name doesn't render, and no error is shown. -
Now, when you navigate to Pack's Customizer, you should see the new metaobject section available to add to your page. Once you add the section to your page, you will have access to all the entries you created in the Shopify admin.
Use metaobject sections in Pack's Customizer
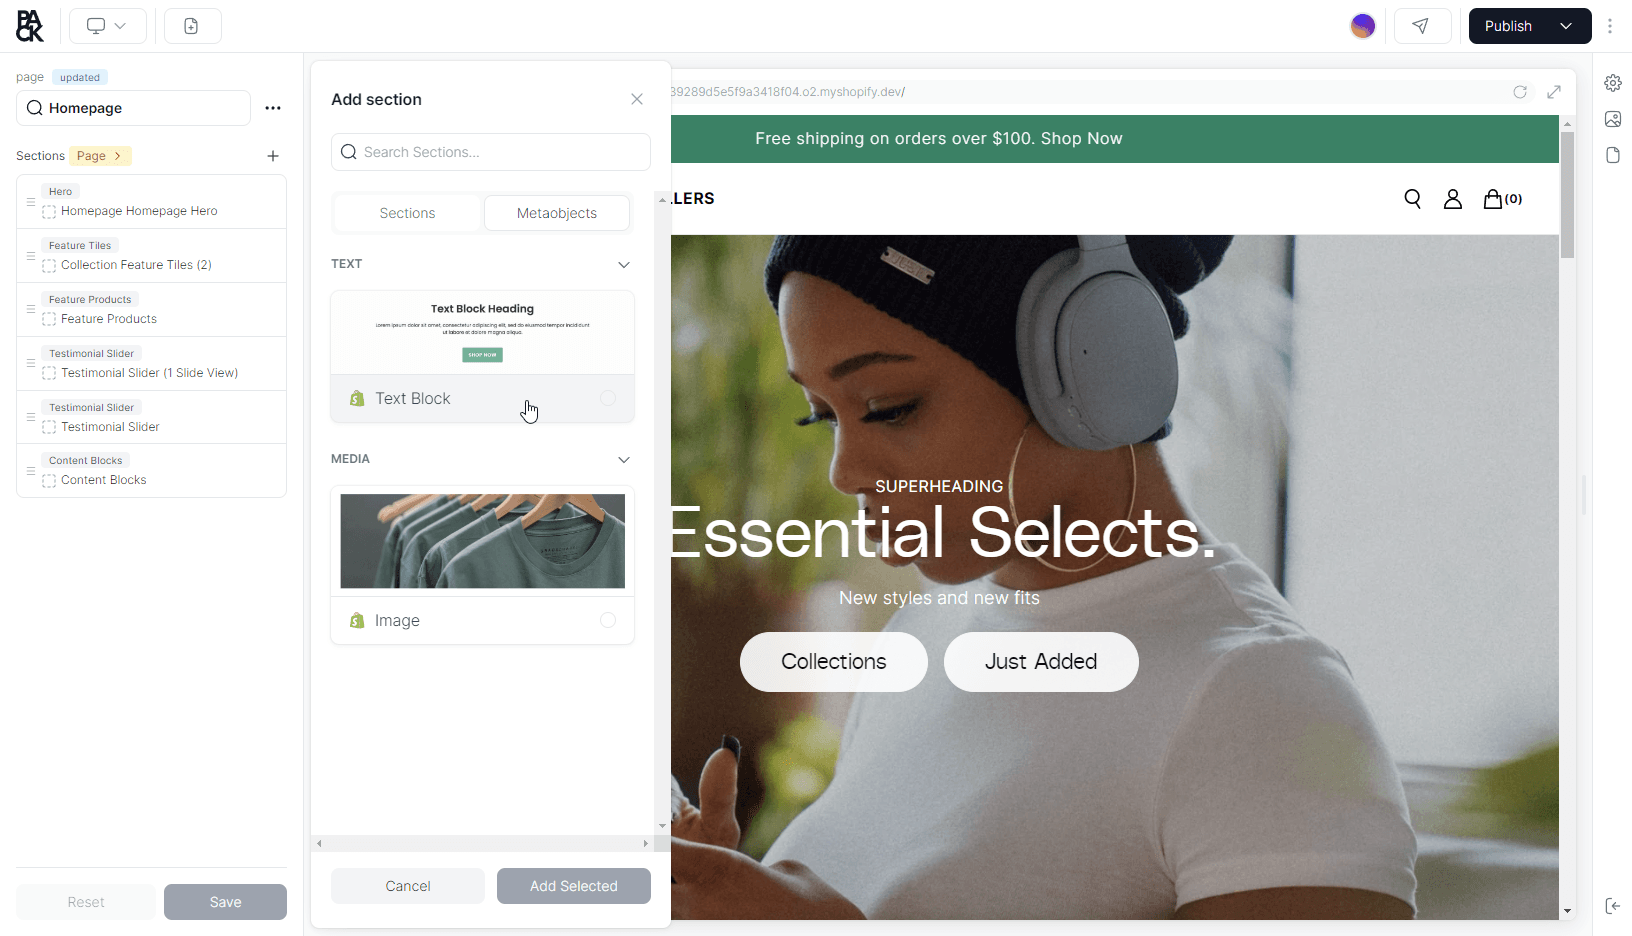
Once you've added a new metaobject section to your codebase, you can use it in Pack's Customizer to add content to your pages.
- Navigate to Pack's Customizer
- Click on + to add a new section to your page
- Select Add New Section
- Select the Metaobjects tab
- Select the metaobject section you created and click Add Selected
- Click the newly added section, then choose an entry from the entry list, or click Create metaobject to start a new one
The section shows the entry's fields from your Shopify definition, and you can edit them in the Customizer. Pack saves your changes to Shopify when you publish: it updates the selected entry, or creates a new active entry if you clicked Create metaobject. The entry is shared, so your edits also change it everywhere else it's used. Once an entry is selected, the section's Shopify link opens it in the Shopify admin.
The selected metaobject content will now display on your page. You can preview your changes using Pack's preview mode to see how they'll look on different devices before publishing.
Advanced Usage: Metaobject Collections
To show several entries in one section, such as a list of team members, reference them from another metaobject. This example also adds a Pack field for the section's heading.
- In Shopify, create a
team_memberdefinition withnameandrolefields. - Create a
teamdefinition with amembersfield: a metaobject reference field that accepts a list ofteam_memberentries (typelist.metaobject_reference). - Create a section whose
dataSourcepoints at theteamdefinition:
MetaobjectTeam.schema.ts
export function Schema() {
  return {
    category: 'Text',
    label: 'Team Members',
    key: 'metaobject-team',
    dataSource: {
      source: 'shopify',
      type: 'metaobject',
      reference: {
        type: 'team',
      },
    },
    fields: [
      {
        label: 'Heading',
        name: 'heading',
        component: 'text',
        defaultValue: 'Our Team',
      },
    ],
  }
}
MetaobjectTeam.tsx
import { Schema } from './MetaobjectTeam.schema'

export function MetaobjectTeam({ cms }: { cms: Record<string, any> }) {
  const { heading, members } = cms
  // Assumes members holds one object of field values per team member
  const entries: Record<string, any>[] = Object.values(members || {})

  return (
    <section>
      {heading && <h2>{heading}</h2>}
      <ul>
        {entries.map((member, index) => (
          <li key={index}>
            {member.name}
            {member.role && <span> ({member.role})</span>}
          </li>
        ))}
      </ul>
    </section>
  )
}

MetaobjectTeam.Schema = Schema
- Register it under the same name as its key:
registerSection(MetaobjectTeam as Section, { name: 'metaobject-team' })
This component assumes members arrives as one object of field values per team member. Log cms with your own data and adjust it to the shape you see before you rely on it.
In the Customizer, the section shows the Heading field followed by the team entry's fields, with each referenced team member as its own group of editable fields. Publishing saves changes to those entries too. Pack fields and metaobject fields share the section's data, so give them different names.
Usage in Routes
Metaobject sections need no extra code in your route loaders. Pack adds the selected entry's field values to the section's data, keyed by the field keys from your Shopify definition, so they load with the page's other sections. Render them with <RenderSections> as usual:
export default function PageRoute() {
  const { page } = useLoaderData<typeof loader>();

  return <RenderSections content={page} />;
}
<RenderSections> passes each metaobject section's field values to its component as cms, as in the MetaobjectTextBlock example above.
Editing Entries in Shopify
Published pages read the selected entry's current values from Shopify, so edits made in the Shopify admin reach your live storefront without publishing in Pack. They don't show right away: Pack and your storefront cache page data, so allow up to about an hour. Publishing anything in Pack clears those caches, so the new values show sooner. The Customizer and preview show the edit once Shopify has notified Pack of the change.
Troubleshooting
Entries Not Appearing in Pack
If the section shows in the Metaobjects tab but its entry list is empty, or creating an entry fails:
- Check that
reference.typein your section'sdataSourcematches the definition's type in Shopify exactly, including underscores. A wrong type gives an empty list. - Make sure Storefronts is checked in the definition's access options. Without it, the list stays empty until you search for an entry by name.
- If the definition uses the Publishable option, only Active entries are listed until you search.
- The list shows the first 100 entries. Search by name to find others.
- Create metaobject creates the entry as Active, so the definition needs the Publishable option turned on.
Field Values Not Rendering
Log the cms prop in your component to see the data it receives. Pack converts some field types before they reach your component:
- True or false: a boolean.
- Dimension, volume and weight:
{value, unit}. - Money:
{amount, currencyCode}. - Rating:
{value, scaleMin, scaleMax}. - Date and time: a formatted US English string, such as
Oct 22, 2026, 3:30 PM, not an ISO date. - File (image or video): a flat object,
{id, url, altText, width, height, mediaType, ...}. The URL isurl, not nested underimage. - List of single line text: an array of strings.
- Metaobject reference: an object of that entry's fields. A list of them is an array of
{id, ...fields}.
Conclusion
Metaobjects provide a powerful way to create reusable, structured content in your Pack-powered Hydrogen storefront. By following this guide, you've learned how to:
- Set up metaobject definitions in Shopify
- Create a Pack section that references metaobjects
- Display metaobject content in your routes
- Allow content editors to select metaobjects through Pack's Customizer
With these tools, you can create dynamic, maintainable content that can be updated in a single place while appearing consistently across your entire storefront.
For more information about Shopify metaobjects, refer to Shopify's official metaobjects documentation.