Storefront Setup: Connecting Shopify and Pack
Pack connects to your Shopify store via a secure OAuth integration. The Pack team will set up a dedicated Shopify app for your store and provide you with an install link. Once installed, Pack automatically handles the token exchange — no manual copying of API keys required.
Connecting Your Shopify Store
Step 1: Request Your Connection
During storefront setup in Pack Admin, you'll be prompted to connect your Shopify store. Provide your Shopify store URL (e.g., your-store.myshopify.com) and the Pack team will prepare your connection.
Once the app is ready, the Install Pack on my Shopify store button will become available and you can continue setup.
Step 2: Install the Pack App
- Click the Install Pack on my Shopify store button in the storefront setup flow.
- You'll be redirected to Shopify's authorization screen.
- Review the requested permissions and click Install.
- You'll be redirected back to Pack automatically.
Step 3: Confirm Connection
After authorization, Pack will automatically:
- Exchange and securely store your API tokens
- Validate that all required permissions are granted
- Begin syncing your products and collections
You'll see a success confirmation in Pack Admin. Click Success, Continue to proceed with the rest of your storefront setup.
Required Permissions
Pack requests the following Shopify permissions during installation. These are configured automatically — no manual scope selection is needed.
Admin API:
- Files (read and write)
- Metaobject definitions (read)
- Metaobject entries (read)
- Products (read)
- Shopify Markets (read and write)
- Store content (read)
Storefront API:
- Metaobject entries (read)
Manual Setup (Legacy)
The manual setup flow is available for stores that were connected before the OAuth integration was introduced, or for stores that have not yet been configured with a Pack app. For new storefronts, use the OAuth flow described above.
You can watch the video below to learn how to set up your Storefront in Pack and link your Shopify store to Pack using the manual token flow.
Creating a Custom App for Your Pack Account
Enable Shopify Custom Apps: - From your Shopify admin, click Settings > Apps and sales channels. - Click Develop apps. - Click Allow custom app development. - Review the provided information and click Allow custom app development.
To create a new storefront in Pack, link your Shopify store to Pack by creating and installing a Custom App in Shopify.
Steps to Create and Install a Custom App:
- From your Shopify admin, click Settings > Apps and sales channels.
- Click Develop apps.
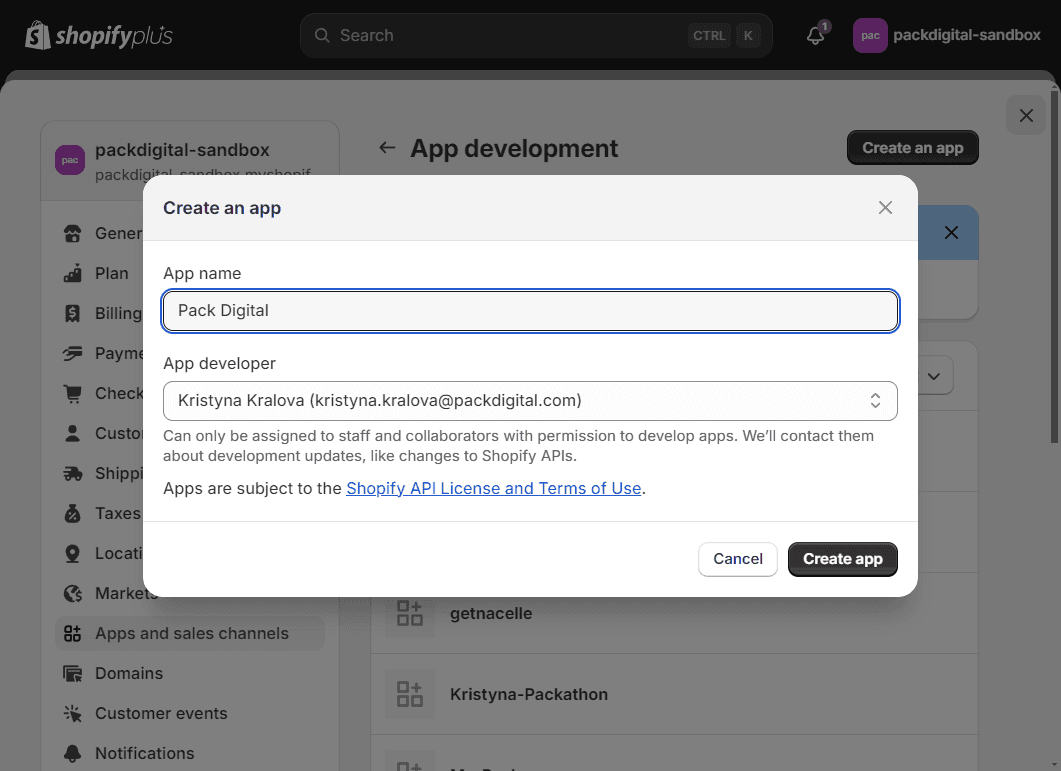
- Click Create an app.
- Enter the App name and select an App developer in the modal window.
- Click Create app.
Configuring Your Custom App Permissions
To ensure Pack functions correctly, configure the following API scopes:
Admin API Scopes
Pack uses these scopes to synchronize and manage your store's products and assets.
Steps to Configure Admin API Scopes:
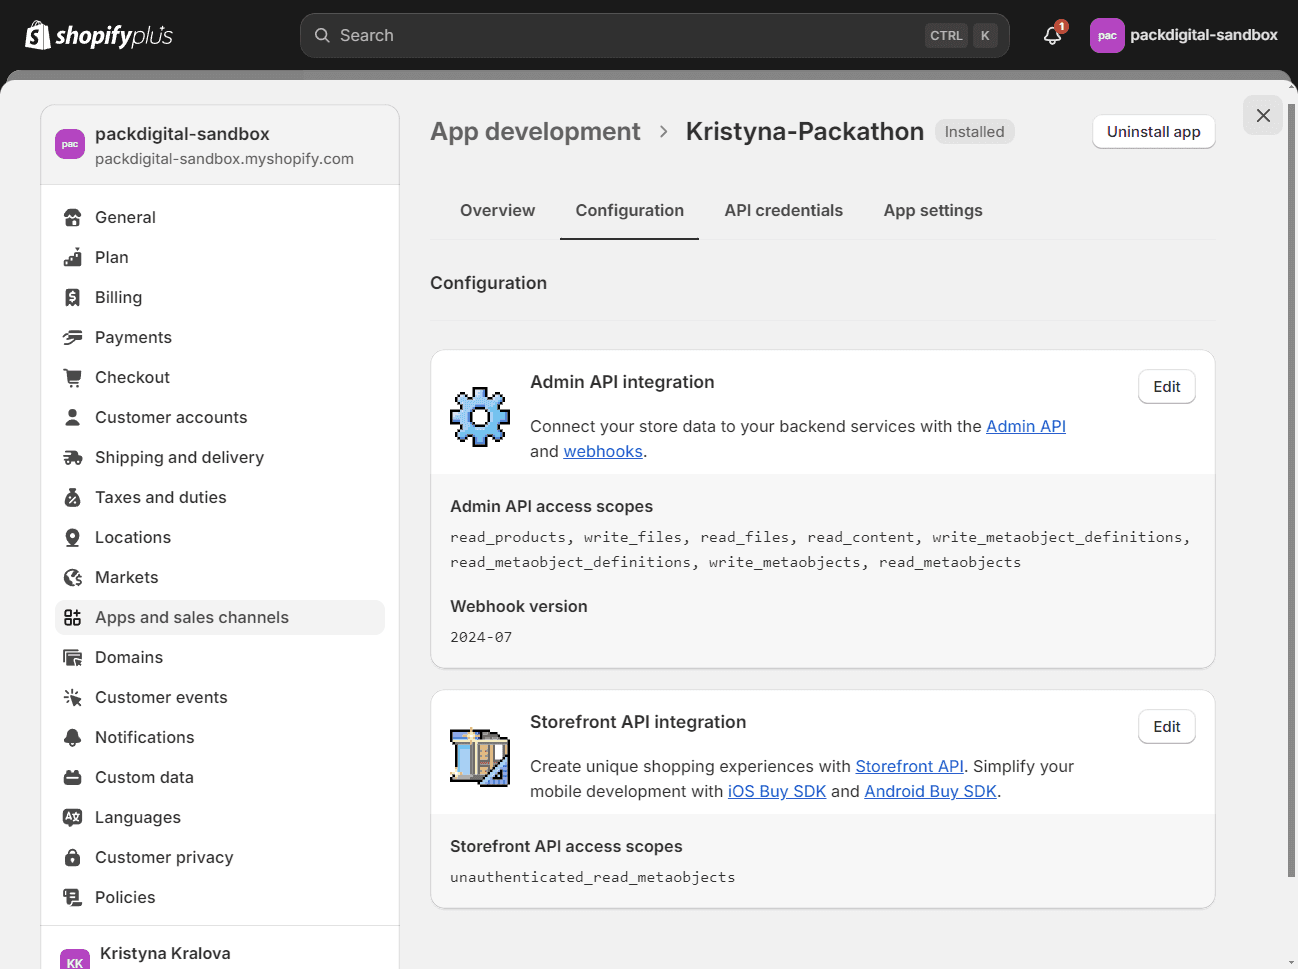
- In your Custom App, navigate to Configuration.
- Click Configure Admin API integration.
- Configure the following properties:
- Files:
write_files,read_files - Metaobject definitions:
write_metaobject_definitions,read_metaobject_definitions - Metaobject entries:
write_metaobject,read_metaobjects - Products:
read_products - Shopify Markets (optional):
read_markets,write_markets - Store content:
read_content
- Files:
- Verify all required scopes are selected and click Save.
Storefront API Scopes
These scopes are necessary for the Shopify Storefront API features, such as Metaobjects, Cart, Customer Account, and Market.
Steps to Configure Storefront API Scopes:
- In your Custom App, navigate to Configuration.
- Click Configure Storefront API integration.
- Configure the following properties:
- Metaobject entries:
unauthenticated_read_metaobjects - Customers: Select all scopes
- Metaobject entries:
- Verify all required scopes are selected and click Save.
Installing Your Custom App and Obtaining API Keys
After configuring your API scopes, install the custom app on your Shopify store to obtain your API keys.
Steps to Install Custom App and Obtain API Keys:
- Click Install app.
- In the modal window, click Install.
- Navigate to API Credentials.
- Note down the Admin API access token and Storefront API access token.
- Remember, the Admin API access token is displayed only once.
Linking Your Shopify Store to Pack
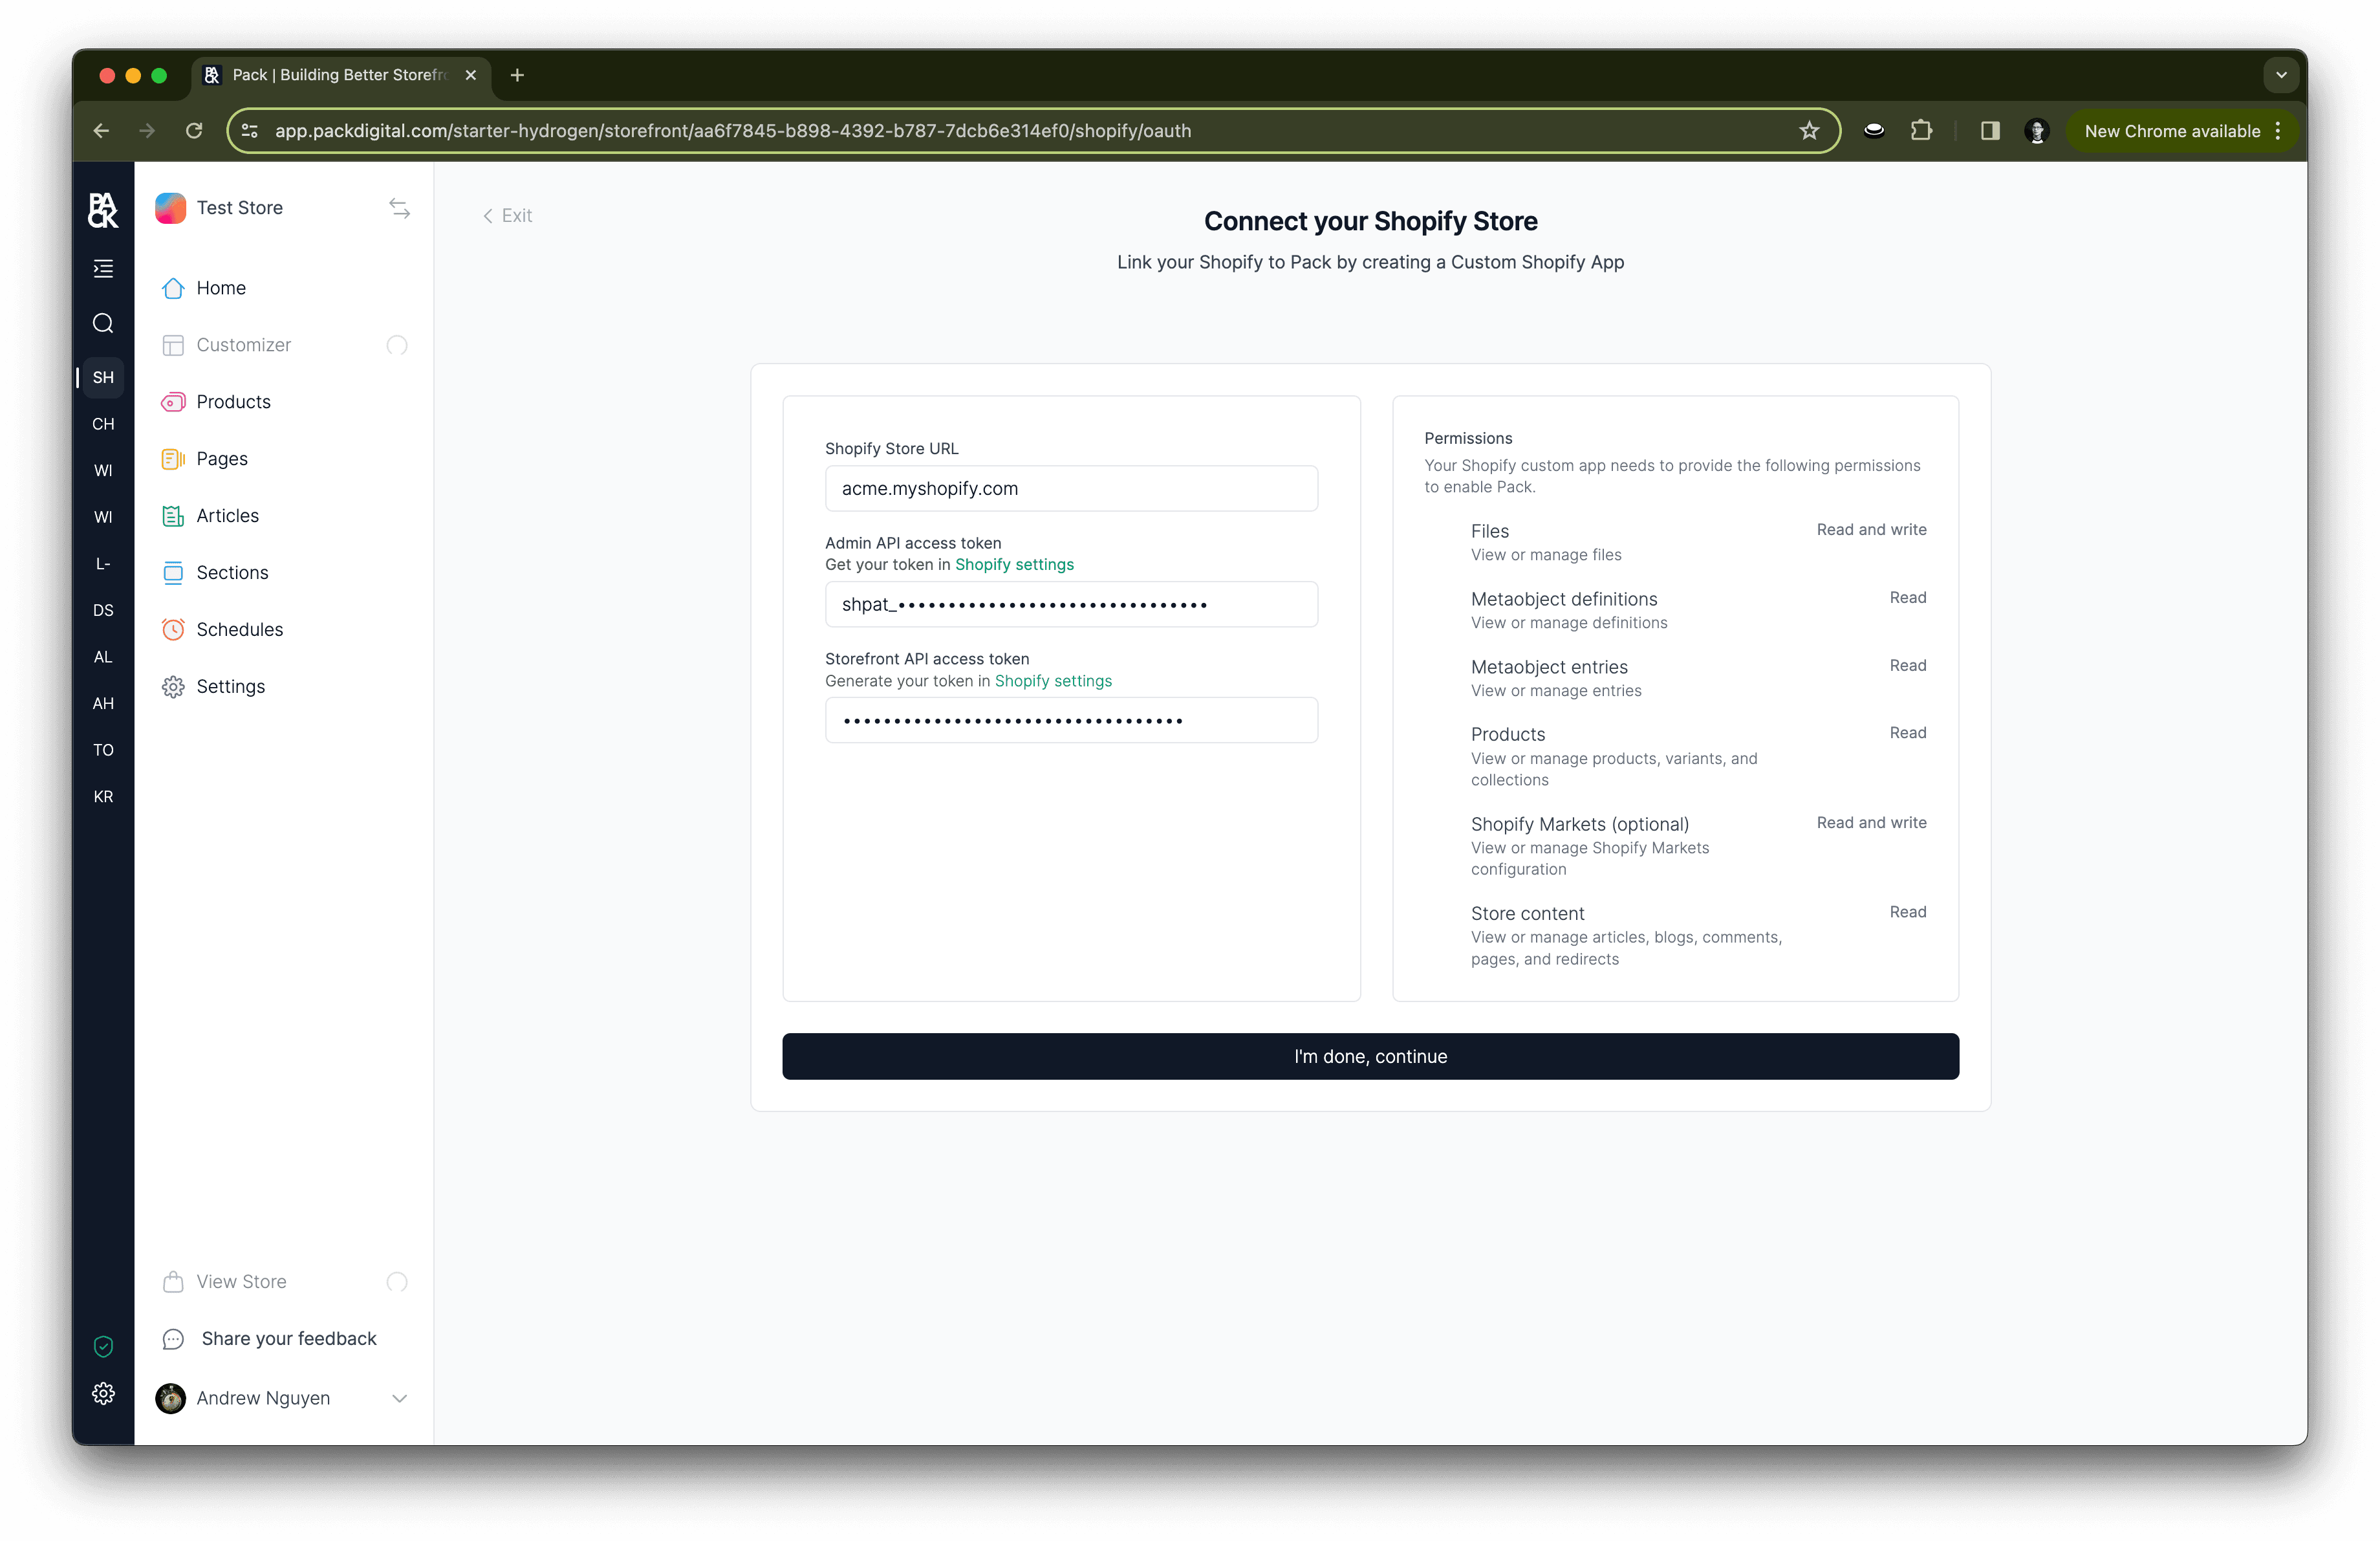
After installing your Custom App in Shopify, create your new Storefront in Pack Admin.
Steps to Link Shopify Store to Pack:
- Navigate to Pack Admin, click on your current instance, and select Create new instance.
- Select 'Create a storefront', name your storefront, and click next.
- Enter your shop URL
your-store.myshopify.com. - Paste your Admin API access token.
- Paste your Storefront API access token.
- Click Connect and wait for confirmation.
- After confirmation, click Success, Continue to continue setting up your Storefront.
Preparing Your GitHub Repository
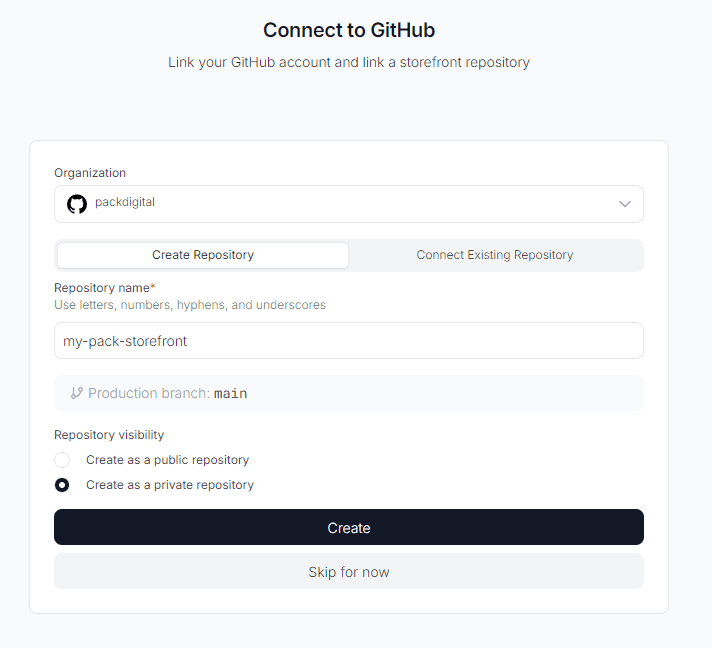
You will be prompted to connect your GitHub repository to Pack.
Steps to Connect GitHub Repository:
- Click Connect.
- Create a repository and name it.
- Click Create.
- Click Success, Continue to proceed.
Setting Up Your Hydrogen Storefront
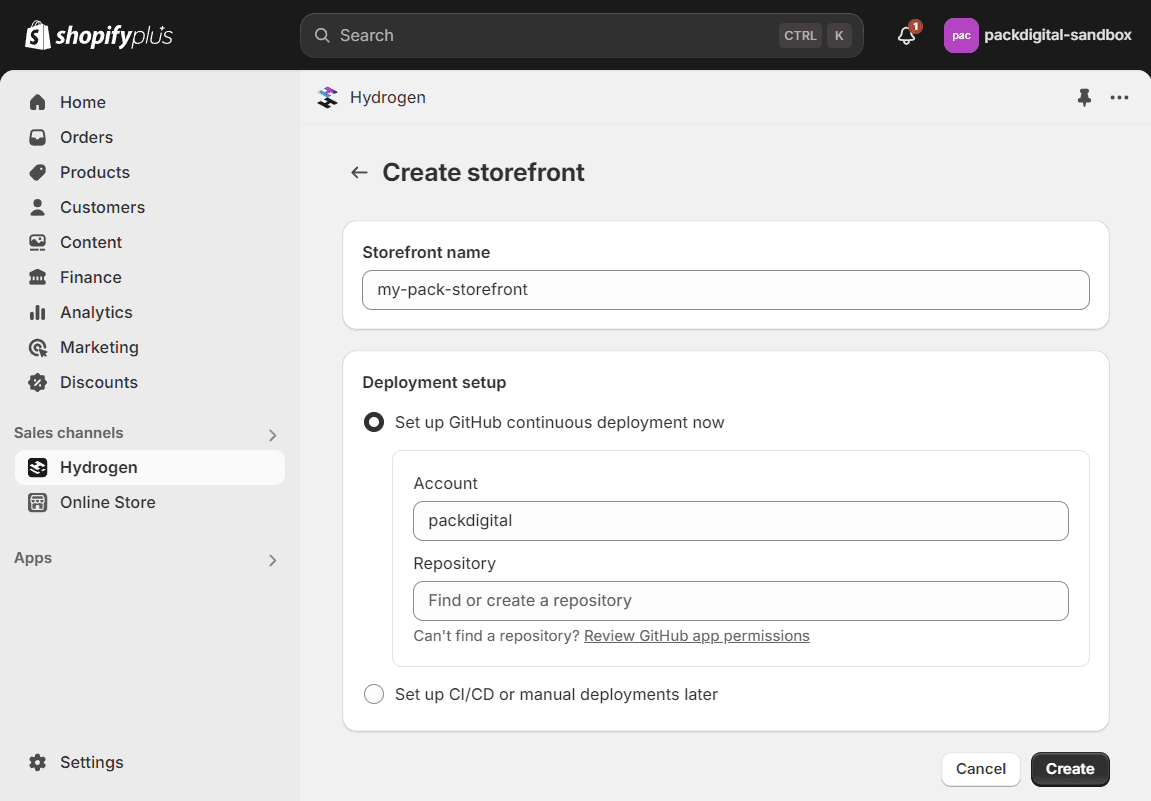
The final step is to create a new Hydrogen storefront on Shopify.
Steps to Set Up Hydrogen Storefront:
- Navigate to Shopify Admin and ensure you have the Hydrogen sales channel installed.
- Click Hydrogen.
- Click Create storefront.
- Name your storefront.
- Select the repository you created in the previous step.
- Click Create. This may take a moment.
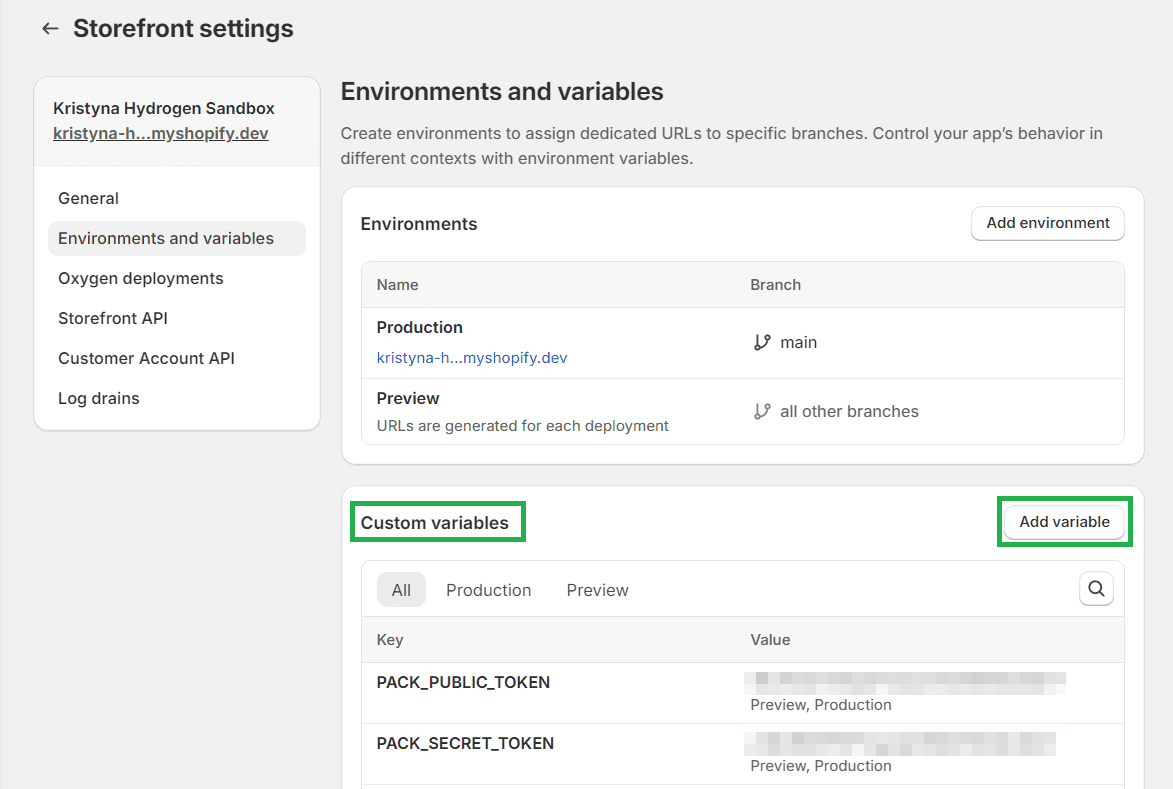
- Click Storefront Settings > Environment and Variables, and copy your Pack environment variables.
- Click on Add variable in Custom Variables section: Add the key, value, and select all environments. Click Save.
- Repeat this step for all variables shown in Pack.
- Navigate to your GitHub repository and merge the pull request created by Shopify.
- Once deployment is complete, navigate back to Pack and click Continue.
- In Your Storefront Details, paste the following:
- Public Storefront URL: Your Hydrogen Storefront URL. Navigate to your Hydrogen Store > Storefront Settings > Environment and Variables > Production, set the URL as public, and click Save.

- Storefront ID: Your Hydrogen Storefront ID. Find it in the URL bar of your Hydrogen Storefront right after the
hydrogen/part of the URL.
- Public Storefront URL: Your Hydrogen Storefront URL. Navigate to your Hydrogen Store > Storefront Settings > Environment and Variables > Production, set the URL as public, and click Save.
- Click Done, Continue to finish the setup.
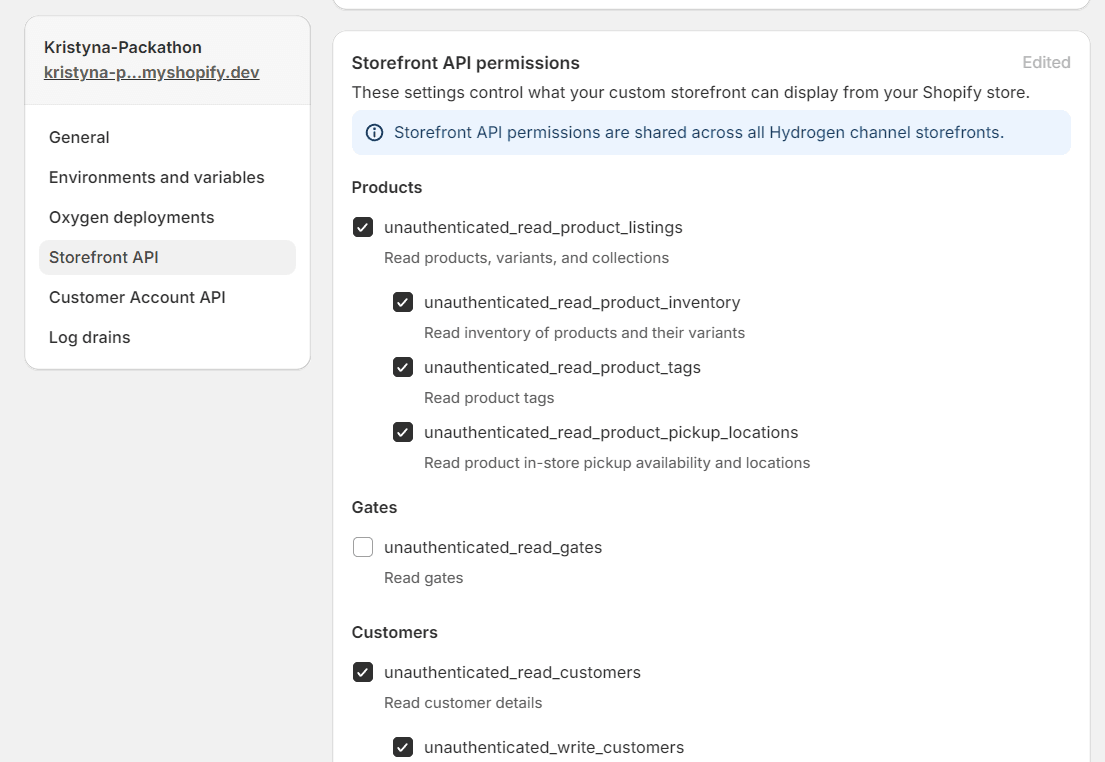
Hydrogen Storefront Required Scopes
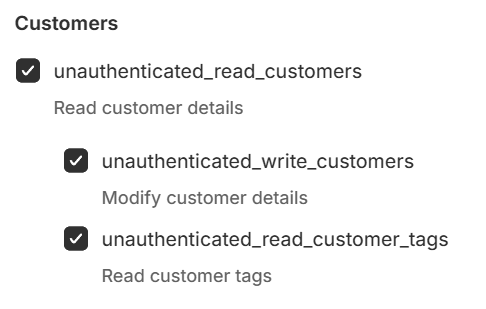
All permissions except 'Gates' are required for the Hydrogen Storefront API.
Ensure unauthenticated_read_customer_tags is selected for the Customer Accounts experience.
Steps to Configure Hydrogen Storefront Permissions:
- Navigate to Shopify Admin > Sales Channels > Hydrogen.
- Click on your Hydrogen Storefront.
- Click Storefront Settings.
- Click Storefront API or Customer Account API to configure the permissions.
Environment Variables
To edit your Hydrogen Storefront environment variables, follow these steps:
- Navigate to Shopify Admin > Sales Channels > Hydrogen.
- Click on your Hydrogen Storefront.
- Click Storefront Settings.
- Click Environments and Variables.
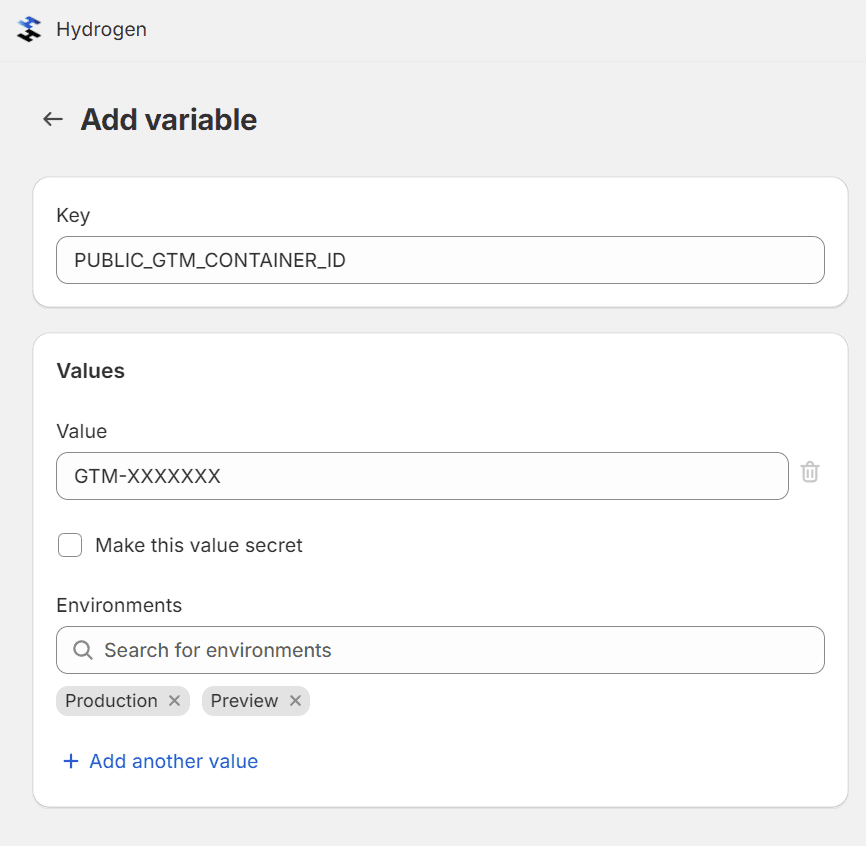
GTM Setup
To add your Google Tag Manager (GTM) container ID to your Hydrogen Storefront, follow these steps:
- Navigate to Shopify Admin > Sales Channels > Hydrogen.
- Click on your Hydrogen Storefront.
- Click Storefront Settings.
- Click Environments and Variables.
- Click Add Variable:
- Key:
PUBLIC_GTM_CONTAINER_ID - Value:
GTM-XXXXXXX - Environments: Select all available.
- Key:
- Click Save.
Redirecting Traffic to Your Hydrogen Storefront
When your Hydrogen storefront is ready to be set as the primary, public storefront, you'll need to redirect traffic from the online store to your Hydrogen storefront.
Steps to Set Hydrogen Storefront as Primary:
For detailed guidance, refer to the Shopify documentation:
Redirect traffic to the Hydrogen storefront
This will ensure your Hydrogen storefront becomes the main entry point for your customers.